Beating between sine tones

Image

This example shows interference between two sine tones that have nearly the same frequency, causing a beating effect. One sine tone is kept at a constant frequency, while the frequency of the other oscillator is continuously modulated up and down by up to 12 Hz, using the technique shown in the previous example, “Modulating oscillator“. The two sine tones are added together, and they interfere at a rate equal to the difference between their two frequencies, causing the sense of beating at that rate.

If you set the modulating oscillator’s frequency to 0, it will stop wherever it is, and the difference between the two tones will remain constant. If you set the modulating oscillator’s amplitude to 0, its effect will be nullified, and the two sine tones will be in unison at 440 Hz.

Note that the amplitude of each of the two tones is set to 0.5 so that the sum of the two amplitudes will never exceed 1, which would cause clipping.

Modulating oscillator

Image

An oscillator is an electronic circuit that generates a cyclic (periodically repeating) signal. Classic examples of oscillator signal patterns include a sinusoidal signal (one that goes smoothly back and forth between two extremes, as a pendulum does in the physical world) or a square wave (one that switches instantaneously back and forth between two extremes, like an on-off switch).

In digital audio, we continue to use the term “oscillator” to refer to a program that generates a cyclically repeating audio signal. In MSP, an example of an oscillator is the phasor~ object, which ramps repeatedly from 0 to (almost) 1, like an ideal sawtooth pattern, at whatever rate of repetition you specify. Another commonly used example is the cycle~ object, which generates a sinusoidal signal with a peak amplitude of 1 at whatever frequency is designated. The way cycle~ actually works internally is that it uses a stored lookup table containing one full cycle of a cosine waveform, and it uses a phasor-like sawtooth pattern from 0 to (almost) 1 to scan repeatedly through that table at the desired frequency and send out the result. (You can also use cycle~ to scan repeatedly through a waveform stored in a buffer~ to produce any arbitrary cyclical signal, but for now we’ll just concern ourselves with its default behavior, which is to generate a sinusoid.)

modulating oscillator is one that we don’t listen to directly, but instead we use its output to control some feature of the sound we do want to hear. Usually (but not necessarily) we set the frequency of the modulating oscillator to a sub-audio rate so that we can perceive its signal shape as it influences some other sound. For that reason, the modulating oscillator is often called a low-frequency oscillator, or LFO. A classic usage of an LFO is to modulate the frequency input of another oscillator that we do want to listen to. That’s called frequency modulation, or FM, and it’s demonstrated and explained in MSP Tutorial 10: Vibrato and FM, as well as in this example.

Normally we want to control at least three aspects of an LFO: its frequency (rate of repetition), its amplitude (the range or “depth” of its modulating effect), and an offset (a constant value added to it to move it into the desired range). Those values could be constant, or they could be changing continuously. (Indeed, they could potentially even be supplied by another LFO.) For this example we use constant values.

This example patch shows one cycle~ object being used as an LFO (the modulating oscillator) and another cycle~ object being used as the sound source (the carrier oscillator). The portion of the patch that’s inside the colored box shows how to use cycle~as the modulator, using number boxes to specify the desired frequency, amplitude, and offset.

Note that the carrier oscillator’s frequency is controlled by a signal (not by typed-in argument or a Max message), which is the sum of a constant value (the offset) of 440, which you can think of as the center or base frequency, and the output of the modulating oscillator, which modifies that base frequency. The range, or depth, of that modulation is determined by the amplitude of the modulator, ± 12 in this case, so the frequency of the carrier will vary continuously between 428 Hz and 452 Hz, which is roughly ± one quarter tone variation of the central frequency. The rate of the variation is quite slow here, 0.1 Hz, meaning that a full cycle of the modulating waveform will occur once every ten seconds. Try other frequencies and amplitudes for the modulator to get an idea of the kind of frequency modulation effects that are possible.

The phase offset value of 0.75 supplied in the right inlet of the modulating cycle~ object means that when audio is turned on, that cycle~ will start 3/4 of the way through its waveform. Since its stored waveform is a cosine, starting 3/4 of the way through that cosine will cause it to start at a value of 0 instead of 1, and it will have a sine phase shift.

Adjust the pitch of a comb filter

Image

This patch demonstrates how to adjust the delay time of a comb filter to make the filter correspond to a desired fundamental pitch.

The filtering formula used by the comb~ object is

y[n] = a x[n] + b x[n-(DR/1000)] + c y[n-(DR/1000)]

wherein R is the sampling rate, D is a delay time in milliseconds, x[n] is the current input sample, y[n] is the current output sample, and a, b, and c are gain scaling factors.

That formula can be shown diagrammatically like this.

In the patch we convert a MIDI-based pitch number into a frequency in Hertz, then use that to calculate the correct delay time for the filter. Using delay feedback (a past y[n] value) with feedback gain approaching 1 creates strong resonance at the comb frequency, yielding an inverted comb response pattern sort of like this,

resulting in a strong imposition of the fundamental pitch and a buzzy timbre.


Adjust pitches according to a pitch class set

Image

One potential use of the “inlist” abstraction is to compare incoming pitches to a pitch class set. This patch uses a % 12 object to find the pitch class of an incoming pitch, then compares it with the members of a prescribed pitch class set. If it belongs to the pitch class set, it gets passed on unchanged; if it doesn’t belong to the pitch class set, it gets pushed up one semitone and tested again.

Note that this patch does point to a potential bug (a so-called “screw case”). If the pitch class set is null (the bag inside the inlist abstraction is empty), any incoming pitch would set this patch into an infinite loop and cause a stack overflow. However, we’re safe in this particular example because we have pre-loaded the pitch class set and there’s no way provided in the program to delete those numbers.

Ask if a number belongs to a set

Image

This abstraction, which I call “inlist”, checks to see if a given number belongs to a previously-collected set of numbers. Numbers in the middle inlet are added to the set, and numbers in right inlet are deleted from the set. A ‘clear’ message in the left inlet deletes the entire set. When a number comes in the left inlet, if it belongs to the set, a 1 will be sent out the outlet, meaning “yes, it’s in the list”; if it doesn’t belong to the set, a 0 will be sent out.

The bag object stores an unordered collection of numbers. Each time a number comes in the left inlet, we store it, then compare it with every number in the bag, storing any “yes” answer we may get. Then we send out the stored answer and reset the stored answer to “no”. (N.B. Technically, we really reset the stored answer before we send out the result, so that “inlist” will be all ready to go even if its output triggers more input in the parent patch. The answer actually gets to the final t object and is stored there for an instant while we reset the i object to 0.)

sigmund~ for pitch tracking

Image

The sigmund~ object is a third-party object for pitch tracking designed by Miller Puckette and Ted Apel, available on their page of downloadable Max objects. You’ll need to have it installed for this example to work. Why is it called sigmund~? ‘Cause it’s your analyst, I assume! You might also want to have downloaded ducker~.maxpat from the previously posted example, so you can try it out in conjunction with sigmund~.

To have sigmund~ attempt to discern discrete notes rather than give a continuous pitch evaluation, use the ‘notes’ argument. Pitches are reported using MIDI-based numbering, but using float values to show fractions of semitones. In most cases, it works better to round those values rather than truncate them, for more accurate representation of the intended pitch.

ducker~ to suppress soft sounds

Image

A “ducker” is a system that turns a signal down to 0 when it’s below a given threshold. It’s useful for suppressing unwanted low-level audio, such as in a cell phone transmission when the user is not talking. Or, more to the point for musical purposes, as in a microphone signal when the musician is not playing.

In this patch the user specifies an amplitude threshold, attack time, and release time, either by sending those values in the appropriate inlets or by typing them in as arguments to the object in the main patch.

When the amplitude of the signal coming in the left inlet goes above the threshold, the >=~object sends out 1, so the rampsmooth~ object starts heading toward 1 in the number of samples specified (i.e., starts fading in the signal). So as not to lose too much of the wanted signal, that fade-in should be quick. A good attack time might be in the range of 5-40 ms, depending on the source. When the amplitude of the signal coming in the left inlet goes below the threshold, the >=~ object sends out 0, so the rampsmooth~ object starts heading toward 0 in the number of samples specified (i.e., starts fading out the signal). For many instruments, the release time might be slower than the attack time, so you might want that fade-out time to be longer than the fade-in time. A good release time might be in the range of 200 ms or more, depending on the source.  In the main patch you can use the mstosamps~ object to calculate the correct number of samples for the fade times.

MIDI-DMX conversion

Image

DMX data is encoded with “channel” information similarly to MIDI so that each receiving device can pay attention only to particular information. Each channel can carry a value from 0-255. Note that it’s therefore easy to convert the standard MIDI range 0-127 to the DMX range 0-255 just by multiplying values by 2 (or by shifting the number one bit to the left).

Using the preset capabilities of pattrstorage

Image


[In order for this example to work properly, you should first download the file called noiseburstpresets.json and save it with that name somewhere in the Max file search path.]

This patch shows some features of pattrstorage, and demonstrates how it might be used to structure a series of different settings to shape the formal structure of a longer period of time.

The first thing to notice is that there is not a single pattr object anywhere in this patch. However, each of the nine labeled number boxes that provides parameter data to thepatcher noisebursts subpatch has been given a scripting name in its object Inspector. The autopattr object, as soon as it is created, finds not only all the pattr objects anywhere in the patch but also all the UI objects that have scripting names, and it makes available all of those names — pattr object names and UI scripting names — to anypattrhubpattrforward, and pattrstorage objects in the patch. So, without needing any pattr objects or explicit bindings, all we need to do is include an autopattr at the top level of our patch, and automatically all the UI objects that have scripting names will be storable and recallable by pattrstorage.

The sonic/musical function of this patch is to generate different randomized patterns of short bursts of filtered noise. The patterns are generated inside the patcher noiseburstssubpatch — and all the MSP objects that create the actual bursts of filtered noise are isolated in another subpatch within that so that they can be easily enabled and disabled to turn the sound on and off — but the UI objects that provide the parameters that shape the noiseburst patterns are all in the main patch. Those UI objects all have scripting names, so they can be controlled by the pattrstorage object, and the pattrstorage can in turn be controlled by the preset object.

Before the whole system of pattr-related objects existed, a standard way to store the settings of all UI objects was with a preset object. (You can see the standard usage of thepreset object in action in an example from one of the original Max tutorials, and another good example can be found in the tutorial patch for MSP Tutorial Chapter 7.) The presetobject was notoriously a bit buggy and problematic, so the pattrstorage system is ultimately superior. Nevertheless, the straightforward graphic interface of the preset object is very effective, so a feature was added to it that would allow it to be used with pattrstorage. All you need to do is create a preset object, then send it a pattrstorage message indicating the name of the pattrstorage object you’d like it to control. From then on, you can use that preset object to store and recall presets in the named pattrstorage.

When the patch is loaded, the pattrstorage object tries to load in the JSON preset file of the same name, called “noiseburstpresets.json”. If you have saved that file correctly in a location that’s findable by Max (i.e., within the Max file search path), that should happen automatically. Because the preset object is bound to the pattrstorage object, You should be able to choose different settings for the parameter UI objects just by clicking on different buttons of the preset. Note that the preset is not controlling those objects directly, as it would in a traditional usage of the preset object; it is controlling the pattrstorage object, which is actually in charge of controlling all the UI objects that have scripting names. You can double-click on the pattrstorage object to see its “Client Objects” window. Note that the on/off toggle does not have a scripting name, so it’s invisible to thepattrstorage; that’s intentional, so that we can turn the sound on and off independently of any preset changes we might make.

Click on the ezdac~ to turn MSP on, use the toggle to turn the noisebursts on, then try choosing one of the 16 saved presets to change the sound.

There is also a subpatch called patcher autopresetchooser that’s intended to demonstrate one possible approach to automating preset changes and preset interpolations. Double-click on it to see its contents. The subpatch is designed to choose a new preset number every 15 seconds, form a recall message that will enable interpolation from the previous preset to the newly chosen present, and then trigger a 5-second interpolation from the old preset to the new preset. The resulting messages will thus say recall <previouspreset> <nextpreset> <interpolationvalue>, with each message having a different interpolation value progressing from 0 to 1 over five seconds. Try turning on the “autopresetchooser” subpatch to cycle randomly through all the different presets. This demonstrates how one might automate changes over a long period of time to create a certain formal structure, one that is either determinate or, as in this case, indeterminate because of randomized decisions.

The composition of known states of a patch, governing its behavior, can be composed in non-real time and stored in a whole collection of presets within pattrstorage, and those presets can then be recalled interactively or automatically in a performance to recreate known behaviors at the desired time.

Storing and recalling multiple pattr values

Image

[In order for this example to work properly, you should first download the file called twocloudspresets.json and save it with that name somewhere in the Max file search path.]

The pattrstorage object allows you to store and recall the states of any and all pattr objects in the patch or its subpatches. Each set of states is stored in a numbered “preset”, and pattrstorage can store as many presets as you’d like. The presets can then all be saved in a separate file, in JSON format, and can be loaded in when the patch is loaded. Thus, we can recall any of a number of states for the entire patch at any time. An additional, and very powerful, feature of pattrstorage is that it can interpolate between two different states.

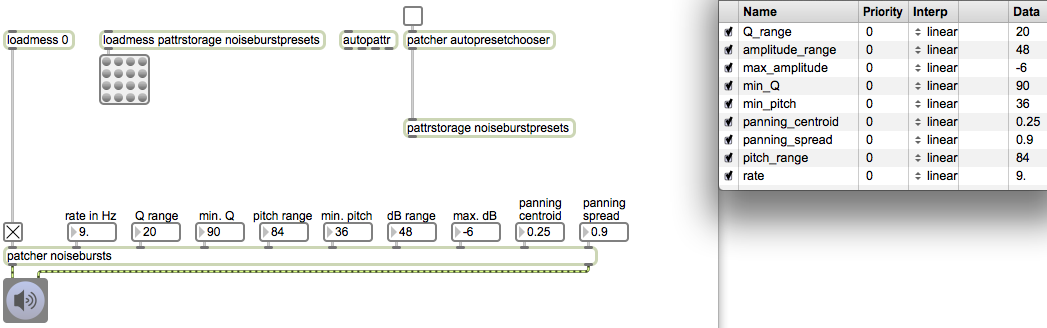
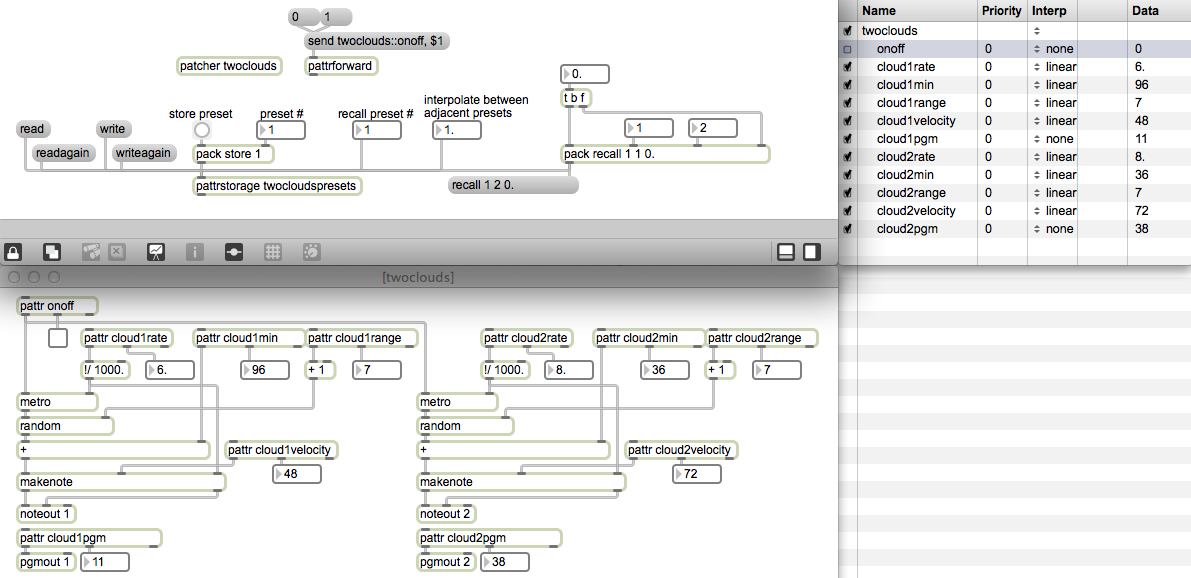
For this demonstration, I made a subpatch called “twoclouds” that generates two streams of MIDI notes. (They’re really just two motorhythmic melodies of randomly-chosen pitches. I call them “clouds” because when the melodies are very fast the random behavior is reminiscent of the random movement of particles in a compressed gas.) The parameters that can be controlled are the rate of the notes (notes per second), the loudness (MIDI velocity), the timbre (MIDI program number), and pitch register, which is specified by height (the lowest pitch that can be chosen) and range (how far above the minimum the pitch might be). There is also a pattr bound to the on/off toggle switch, so that the process can be turned on and off remotely. Note that the UI objects attached to the pattrs do not have scripting names, but they are bound to the pattr by the patch cord coming from the pattr‘s middle inlet. This allows you to see the value of each pattr, and also to modify the contents of each pattr by changing the UI object.

We can store the current state of all the patch’s pattr objects in pattrstorage by sending pattrstorage a store message specifying the preset number where we want it to keep the data. In the main patch, we use a pack object to construct the store message. This allows you to choose a preset number, and then click on a button to trigger the storemessage. (The fact that you have to explicitly click on the button after having specified the preset number in order for anything to be stored helps prevent accidentally overwriting previously-stored presets. If you were simply to use a number box attached to a message box saying store $1, every single number from the number box would cause a preset to be stored.) To recall a preset, all you have to do is provide pattrstorage the number (int or float) of the preset you want to recall.

The preset file “twocloudspresets.json” contains five presets. Use the number box labeled “recall preset #” to choose a preset from 1 to 5. You should see the UI objects in the subpatch change accordingly, showing the values that have been recalled for each pattr. If you don’t see that, perhaps the preset file was not loaded properly into thepattrstorage. (When the patch is first loaded, pattrstorage uses its own name to look for a .json file of the same name, but if it can’t find such a file, it will contain no presets.) You can read in a preset file by sending pattrstorage a read message. You can also create new presets, if you’d like, by using the UI objects in the subpatch to change the pattrvalues the way you want them, then storing that data in a pattrstorage preset (presumably in presets 6 and higher). You can then write the presets to a new file with the writemessage, or directly to the same file with a writeagain message.

One of the most interesting aspects of pattrstorage is its ability to calculate pattr data that is somewhere in between two presets, using a process of interpolation between the values in two presets. You can specify an interpolation between two adjacent preset numbers just by using a float value with a fractional part. For example, to get data that is right between the values of presets 1 and 2, you could send pattrstorage the number 1.5. Try using the float number box labeled “interpolate between adjacent presets” to try this out.

If you want to interpolate between non-adjacently numbered presets, the syntax is a bit more complicated. The message should start with the word recall followed by one preset number (let’s think of it as preset A) and then another preset number (we’ll think of that as preset B) and then a value from 0. to 1. specifying the location between preset A and preset B. A value of 0 is preset A, 1 is preset B, and intermediate values are some degree of the way from A to B. In this patch, you can specify the two presets between which you want to interpolate, and you can then drag on the number box labeled “interpolation between preset A and preset B”, from 0. to 1., to trigger well-formed recall messages topattrstorage.

You can see the current value of each pattr by double-clicking on the pattrstorage object, which opens a “Client Objects” window. Try that. If you want to, you can even double-click on the data values in the client window to type in new values. You can see that you also have a choice of what type of interpolation you want between presets for each pattr. (See the reference page for a description of the different types of interpolation.) Since interpolating between different MIDI program numbers would mean hearing the timbre of every intermediate program number, interpolation doesn’t make much sense for those pattrs, so we have set the interpolation for those items to “none”. In the leftmost column of the client window, you can also enable and disable the effect of the pattrstorage object on each pattr. Notice that we have disabled pattrstorage‘s control of the pattr onoffobject in the “twoclouds” subpatch, because we don’t want that to be affected by preset changes. We’ll control that separately by another means.

In the main patch, you see yet another useful object, pattrforward. By sending pattrforward the word send followed by the name of a pattr, you can set the destination for thatpattrforward object. Then any subsequent messages to pattrforward will be forwarded to the named destination. So in our case, each time we click on the message boxes saying 0 or 1, the message will be forwarded to the pattr onoff object in the “twoclouds” subpatch. This shows yet another way to communicate remotely between main patch and subpatch.

Try out a few of the presets, try interpolating between presets, and if you’d like, try creating, storing, and recalling new presets of your own making.