Communicate with many pattr objects from a central hub

Image

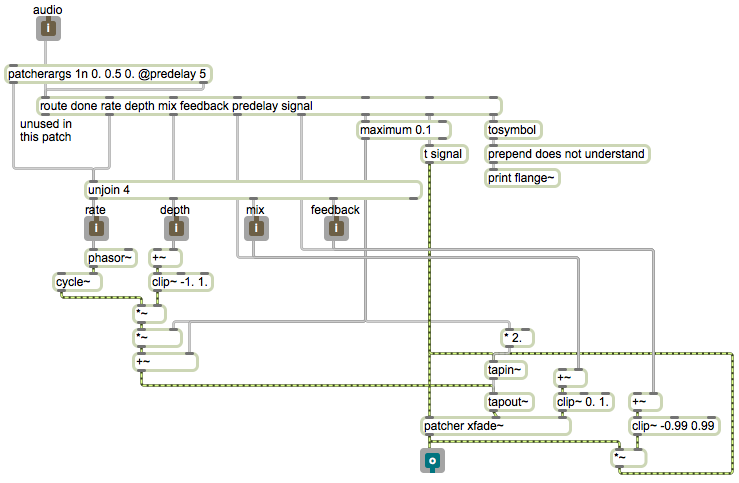
In large and complex patches that have many pattr objects, it might be useful to be able to communicate with all of them at one central location. That is the purpose of the pattrhub object. With pattrhub you can alter the contents of any pattr just by using the name of the pattr followed by the data you want to put in it. You can also query the current contents of any pattr by preceding its name with the word “get” (as in gettempo if there is a pattr tempo object somewhere in the patch). You can query the contents of all the pattr objects in the patch with the message getstate. Whenever you query the values of pattr objects, the information comes out the right outlet of pattrhub, preceded by the name of the pattr(s) in question. Thus, you can use a route object to look for and parse the values of the various pattrs coming out of pattrhub.

In this example, we have made a program that performs simple rational polyrhythms. We specify a numerator and denominator for the ratio of one rhythm to another, and we divide those values into 1920 (the number of ticks in a whole note) to determine the correct number of ticks to use as the time intervals for the two metros. We’re using a named transport object, with the name “clock1”, to keep it distinct from the global transport. The numerator, denominator, and beat tempo are all stored in pattrs so that we can set them in one part of the patch and use them in another part.

Whatever the values of the pattrs are when the patch is saved, those values will be saved with the patch and will be sent out when the patch is loaded. Using the getstate message to pattrhub, we can query the saved contents of each pattr, and can use that information to set the initial values of the UI objects. Notice that in this case, the pattrs are not explicitly bound to any UI objects, and the UI objects don’t have any scripting names. We’re just using the getting and setting capabilities of pattrhub to make the communication between the UI objects and the pattrs.

Binding pattr objects between a subpatch and its parent patch

Image

pattr object can be remotely bound to another pattr or to a UI object, using the bindto attribute, even if one of them resides in a subpatch. To indicate an object in a subpatch, the syntax for pattr‘s bindto attribute is to use the subpatch name, followed by two colons — :: — followed by the name of the object to which you want to bind. Use of that syntax is shown in the pattr in the main patch. Notice that to do this with a patcher object, the patcher needs to have a name typed in as an argument. And of course the object to which you intend to bind needs to have a name, too. If you look inside the patcher degtorad subpatch, you’ll see a pattr object with a typed-in name degrees. The pattr in the main patch can bind to it by using the patcher object’s name and the name of the pattr object inside the subpatch.

To communicate in the opposite direction, from a pattr in a subpatch to some object in the main patch, you just refer to the patch one level above using the name “parent”. In our subpatch, we have a pattr that is bound to the number box named “radians” in the parent patch. (Although it’s not demonstrated here, you could even bind objects through multiple levels of subpatches, using multiple :: symbols, as in @bindto parent::parent::radians.)

You may wonder, “Why couldn’t we just put an inlet and an outlet in the patcher subpatch, and communicate with it via patch cords?” And you’d be quite right. In this simple example, that would be easier. (But it wouldn’t have given us the pretext to discuss the :: syntax.) In more complex situations, you’ll see how the ability to bind a pattr to objects on other hierarchical levels can be useful.

Notice how, in this example, the pattr objects in the subpatch have typed-in names, but the one in the main patch does not. We didn’t bother to give that pattr a name because no other object needs to bind to it. (It takes care of binding to the degtorad::degrees object all by itself.) As far as Max is concerned, though, all pattr objects have a name. If you don’t type one in, Max internally assigns it a quasi-random name.

Binding objects to each other, and to a pattr

Image

If you want two user interface objects always to display the same information, it might seem sensible to connect the outlet of one to the inlet of the other and vice versa. However, that will lead to an infinite loop unless you do something to stop one of them from always sending out the value. The set message is useful in that regard, because it allows you to set the contents (and the display) of a UI object without causing that object to send out a message of its own. The top part of the patch demonstrates this technique. Whenever the slider is moved by the mouse, it sends its value out to the number box. The number box displays that value and passes it on out its outlet, so both objects end up showing the same (most recent) value. But what if the user changes the number box directly with the mouse? We would want the slider to be updated as well. That’s why we use the setmessage to set the content and appearance of the slider without causing it to send out that value again (which would cause the feared infinite loop). In this way, no matter which object is moved by the mouse, they both correctly show the most recent value.

A pattr can be bound remotely to one of those two UI objects by referencing the object’s scripting name (as set in the object’s Inspector). Since the two UI objects are bound to each other using the set technique described in the previous paragraph, the effect is as if the pattr were bound to both of those UI objects.

Binding a pattr object to another object

Image

pattr object can be “bound” to another object, so that the two objects share the same data. By setting the pattr‘s bindto attribute, you can bind it to any other named pattr object, or a user interface (UI) object that has a scripting name. In this example, we have set the scripting name of the number box at the bottom of the patch to “panning” in the object’s Inspector. That allows us to bind it remotely (with no patch cord) to the pattr. (Incidentally, although it’s not demonstrated here, you can also bind a pattr to a UI object, even an unnamed one, by connecting the UI object to the pattr‘s middle outlet.) Once the two objects are bound together, any change to the contents of one of them will be shared by the other, and the contents can be recalled from either of them with a bang. Also, both of them will send out their stored message when the patch is loaded.

Introduction to the pattr object

Image

The pattr object and its related objects such as pattrhubpattrforwardautopattr, and pattrstorage make it possible for you to store data (or any sort of message, really), recall that data when the patch is reopened, store and recall it from other parts of the patch, and make transitions from one set of stored data to another.

The basic unit of storage is the pattr object. It can store any message, its contents will be saved as part of the patch, and it will recall and send out its saved message when the patch is loaded.

Try the xfade~ abstraction

Image

For this example to work properly, you must first download Example 51 and save it with the name “xfade~.maxpat”. Then you must ensure that your xfade~.maxpat file is in the Max search path, or you must save this example patch in the same folder as the xfade~.maxpat file and reopen it, so that this patch can find the xfade~ object.

This example demonstrates two ways to establish the initial crossfade value of the xfade~ abstraction. The example on the left uses an initial float argument to establish the initial crossfade value. If you double-click on the xfade~ object on the left, you will see that the two objects that had a #1 argument in the subpatch now have the number 0.1 in those places. This sets up the object so that the cycle~ 440 will have an amplitude of 0.9 in the mix, and the cycle~ 465 object will have an amplitude of 0.1 (about 19 dB lower). The example on the right uses a control signal from the line~ object to provide the crossfade value. So in this case there’s no point in typing in an argument in the xfade~ object, because it would not be used by the MSP objects in the subpatch anyway. The argument to the line~ object, however, is important, since it establishes the initial value of that signal. That’s where the real initialization takes place for the crossfade value of that xfade~ object.

Notice that the number boxes in these examples show a value of 0 initially, which does not accurately represent the actual initial crossfade value. So if these objects will be presented to the user, and you want them to show the correct value, you would need to initialize them to the value 0.1, too. You could do that with a loadbang object triggering a message of 0.1 or set 0.1.

The gain~ sliders are provided so that you can choose to listen to one or the other of the two halves of this example.