Binding objects to each other, and to a pattr

Image

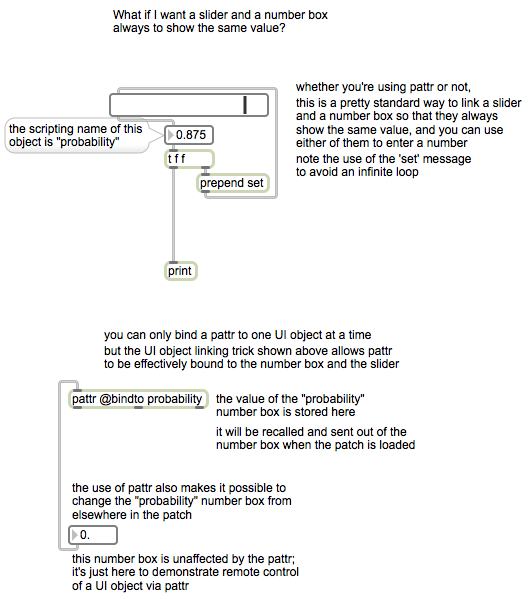
If you want two user interface objects always to display the same information, it might seem sensible to connect the outlet of one to the inlet of the other and vice versa. However, that will lead to an infinite loop unless you do something to stop one of them from always sending out the value. The set message is useful in that regard, because it allows you to set the contents (and the display) of a UI object without causing that object to send out a message of its own. The top part of the patch demonstrates this technique. Whenever the slider is moved by the mouse, it sends its value out to the number box. The number box displays that value and passes it on out its outlet, so both objects end up showing the same (most recent) value. But what if the user changes the number box directly with the mouse? We would want the slider to be updated as well. That’s why we use the setmessage to set the content and appearance of the slider without causing it to send out that value again (which would cause the feared infinite loop). In this way, no matter which object is moved by the mouse, they both correctly show the most recent value.

A pattr can be bound remotely to one of those two UI objects by referencing the object’s scripting name (as set in the object’s Inspector). Since the two UI objects are bound to each other using the set technique described in the previous paragraph, the effect is as if the pattr were bound to both of those UI objects.

Try the xfade~ abstraction

Image

For this example to work properly, you must first download Example 51 and save it with the name “xfade~.maxpat”. Then you must ensure that your xfade~.maxpat file is in the Max search path, or you must save this example patch in the same folder as the xfade~.maxpat file and reopen it, so that this patch can find the xfade~ object.

This example demonstrates two ways to establish the initial crossfade value of the xfade~ abstraction. The example on the left uses an initial float argument to establish the initial crossfade value. If you double-click on the xfade~ object on the left, you will see that the two objects that had a #1 argument in the subpatch now have the number 0.1 in those places. This sets up the object so that the cycle~ 440 will have an amplitude of 0.9 in the mix, and the cycle~ 465 object will have an amplitude of 0.1 (about 19 dB lower). The example on the right uses a control signal from the line~ object to provide the crossfade value. So in this case there’s no point in typing in an argument in the xfade~ object, because it would not be used by the MSP objects in the subpatch anyway. The argument to the line~ object, however, is important, since it establishes the initial value of that signal. That’s where the real initialization takes place for the crossfade value of that xfade~ object.

Notice that the number boxes in these examples show a value of 0 initially, which does not accurately represent the actual initial crossfade value. So if these objects will be presented to the user, and you want them to show the correct value, you would need to initialize them to the value 0.1, too. You could do that with a loadbang object triggering a message of 0.1 or set 0.1.

The gain~ sliders are provided so that you can choose to listen to one or the other of the two halves of this example.

Abstraction for mixing or crossfading two audio signals

Image

This patch is functionally identical to the mix~ abstraction in Example 1; you can read its explanation there. It’s repeated here in order to begin a series of examples regarding “initialization”: setting up the initial state of your program the way you want it. This patch demonstrates the use of a # argument in an object box to designate a value that can be specified in the parent patch when this patch is used as an abstraction (an object in some other patch). When this patch is used as an object in another patch by typing its filename into an object box, whatever is typed in as the first argument in that object box will be used in place of the #1, wherever it appears in this patch. (Subsequent arguments in the parent patch could be accessed with #2, #3, etc.) If nothing is typed in as an argument in the parent patch, the # arguments will be replaced by the integer value 0.

In this example, the #1 argument means that the initial crossfade value (to specify the balance between the audio signals coming in the first two inlets) can be typed into the object box in the parent patch. Notice that if the user does not type in any argument, the default behavior of this patch will be to send out only the audio signal of the left inlet, because the crossfade value will be 0 by default, resulting in a multiplier of 1 for audio signal 1 and a multiplier of 0 for audio signal 2.

[You can read a thorough explanation of the # argument in an excerpt from the Max 4 manual regarding the changeable arguments $ and #.]

An important thing to notice in this abstraction is that it has been constructed in such a way that the crossfade value coming in the rightmost inlet can be provided either as a float or as a control signal. If a person just wants to set a static crossfade value, a float is sufficient. It can be typed in as an argument and/or provided in the right inlet. For a dynamically changing value, though, a control signal is better. If, in the parent patch, a MSP signal is connected to the rightmost inlet of this patch, then any typed-in argument (and any float in the right inlet) will be ignored by the right inlets of the -~ and *~ objects in this patch.

Rhythmic automated panning

Image

This example allows a choice of four different modes of intensity panning, and two ways to specify the rate of panning change. The choice of four possible pannings is: static centered, left-to-right sudden switching, left-to-right gradual gliding, and random gliding. The rate of change can be controlled by sliders, either in Hertz (changes per second) or note values (based on the current transport tempo).

A few objects and techniques here bear some explanation. The bit-shift operator >> shifts the binary form of an integer some number of bits to the right, which is equivalent to dividing by a power of 2. So shifting an integer 3 bits to the right is equivalent to an integer division by 8 (with the remainder being discarded). Why not just use a / 8 object? No reason (although it’s perhaps a little more computationally efficient). It’s just a nerdy way to scale down a range of numbers, by focusing only on the most significant bits of its binary form. The radiogroup object allows you to create a related set of mutually exclusive buttons, providing the user a choice of one (and only one) of several options. It sends out the index number of the selected button (counting up from 0).

The pcontrol object allows certain types of automated control of a subpatch or abstraction. One thing you can do is totally disable the MIDI and audio functions of a subpatch or abstraction, with the message enable 0 (and enable 1 to re-enable it). Inside those patcher objects that are getting enabled/disabled by the radiogroup, the audio chain of each one ends with a pass~ object. The pass~ object normally passes audio signals through unchanged, but it sends out a constant signal value of 0 whenever its patcher is disabled. This is crucial so that the subpatch doesn’t get stuck sending out a constant non-zero signal when it’s disabled. The fact that all the subpatches send out 0 when they’re disabled means that they don’t get in the way of the one subpatch that is enabled, when the signals all are added together in the right inlet of the patcher pan~ object.

Granulation of a recorded sound

Image

In classic granular synthesis, grains are very short windowed segments of sound, normally from 5 ms to 100 ms in length. A stream of sound grains be spaced at exactly the same time interval as the grain length, or at some greater interval of time. The spacing can even be randomized (some random time interval greater than or equal to the grain length). A single stream of grains is all you can do with a single groove~ object.

Although it’s not demonstrated here, you could have a multiplicity of such streams going with multiple groove~ objects, or with multiple instances in a poly~ object, which would result in some overlapping of grains, making a “cloud” of grains, and if it’s a dense enough cloud it starts to sound like one continuous sound.

This is an example patch that creates one steady stream of grains randomly chosen from a 10-second recording. You can set the grain length and the grain spacing to whatever timings you want. Here we use a 5 ms attack time and a 5 ms release time, so the minimum grain length in our case is 10 ms. Therefore, we limit the minimum grain spacing to 10 ms, too. (The number box setting the time interval for the metro object has had its minimum value set to 10 in the Inspector.) Each grain starts at a randomly-chosen start time in a 10-second buffer~. Each grain is also assigned a random loudness and a random panning. To make grains that are more like notes than grains, you can make grain lengths/spacings that are greater than 100 ms.