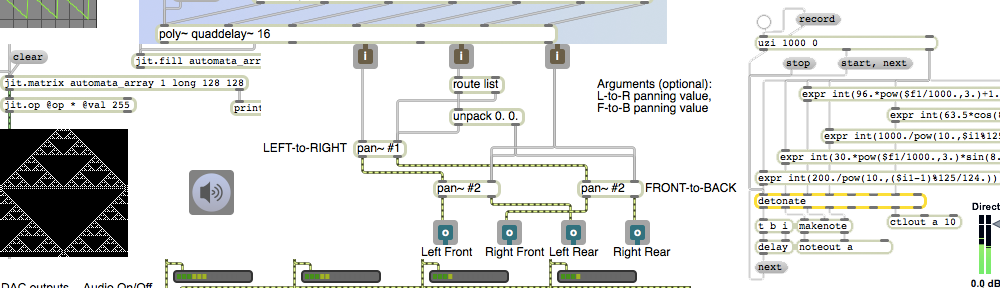
The jit.qt.movie object has a large number of attributes that you can use either to modify the object’s behavior or to get information about the video it’s playing. To set an attribute, you send a message consisting of the name of the attribute followed by the value(s) you want that attribute to have. For example, to set the ‘vol’ attribute (the volume of the video) to 0.5, you send the message ‘vol 0.5’ to jit.qt.movie. To find out what the value of a particular attribute is, just precede the attribute name with ‘get’, all in one word, such as ‘getvol’. (Not all attributes are settable; some are only gettable.) When you request to get the state of an attribute (known as “querying” that attribute), the attribute name and value will come out the right outlet of jit.qt.movie (and most Jitter objects) as a single message, such as ‘vol 0.5’. You can use the route object to look for particular types of messages by detecting the first word of the message (called the message’s “selector” in object-oriented programming lingo). If route finds a match to one of its typed-in arguments, it will send the rest of the message (without the selector) out of its corresponding outlet.
You can also initialize the state of an object’s attributes by typing in the attribute symbol ‘@’ followed immediately (without a space) by the name of the attribute you want to set, followed (with a space) by the value of that attribute. In this example, the jit.qt.movie object has four of its attributes initialized to something other than their normal default values. The vol attribute is set to 0 (it’s normally 1 by default) so that the audio will be silenced; the autostart attribute is set to 0 (it’s normally 1 by default) so that the movie won’t start to play automatically as soon as it’s read in; the unique attribute is set to 1 (it’s normally 0 by default) so that the object will only send out a jit_matrix message when it has a new frame of video that it hasn’t previously sent (this means that even if it is triggered faster than its video’s frame rate, it won’t send out duplicate matrices); and the adapt attribute is set to 1 (it’s normally 0 by default) meaning that the object will resize its internal matrix to be the right size for the movie it’s trying to play.
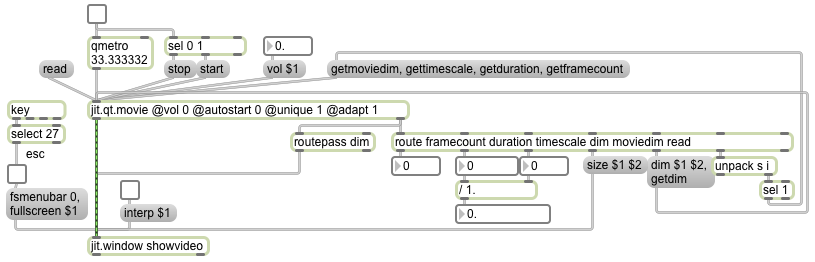
Click on the read message box to open a video file. Here’s a very handy fact: after jit.qt.movie tries to read in a video in response to a ‘read’ message, it sends out a read message of its own out the right outlet. The word ‘read’ is followed by the name of the movie file, followed by a 1 if the movie file was opened successfully or a 0 if the read was unsuccessful. By checking that success indicator, you can see whether the file was read in successfully, and if it was (i.e., if the sel 1 object sends out a bang), you can use that bang to trigger other things you might want to do. Here’s what we decided to do…
As soon as the movie is opened successfully, we check its ‘moviedim’ attribute to learn its dimensions in pixels, we check the ‘timescale’ attribute to learn what QuickTime timing units it’s using (how many time units per second it has, most commonly 600), we check the ‘duration’ attribute to see how long the movie is (‘duration’ is expressed in timescale units, which is why we need to know the timescale units first, so that we can calculate the duration in seconds), and we check the ‘framecount’ attribute to know how many frames are in the video. (So, although we don’t do it in this example, you could divide the framecount, which is expressed in frames per second, by the duration in seconds, which you can calculate by dividing ‘duration’ by ‘timescale’, to learn the frames-per-second frame rate of the video. Or alternatively, you could query the ‘fps’ attribute, and use that to divide ‘framecount’ by ‘fps’ to learn the duration in seconds.)
If you look at the route object, you can see that we’re using it to detect the different messages that will come out. It detects the ‘read’ message to know whether the movie has opened successfully, it detects the ‘moviedim’ message to learn the movie’s dimensions and sends that information back to jit.qt.movie as part of a ‘dim’ message to resize the object’s internal matrix and also sends it to jit.window as part of a ‘size’ message to resize the display window, it uses the timescale and duration information to calculate the movie’s duration in seconds, and it shows us how many frames total are in the video.
The ‘interp 1’ or ‘interp 0’ message to jit.window will turn interpolation on or off. If the user resizes the display window to enlarge it (by dragging on the lower right corner of it), the window will be larger than the dimensions of the matrix it’s receiving, and the video may appear somewhat “pixelated” and blocky. Turning interpolation on causes jit.window to interpolated between pixels instead of simply duplicating pixels, which will make the video appear less jaggedly pixelated.
If you want to fill the entire screen with the contents of jit.window, you can send the message ‘fullscreen 1’ to jit.window to turn on its ‘fullscreen’ attribute. If you also want to hide the menubar when it goes to fullscreen, you can set the ‘fsmenubar’ attribute to 0 (meaning “no menubar when going to fullscreen”). HOWEVER, beware. If you fill the screen and hide the menubar, how will you ever get back to your Max patch? It’s a good idea, before you send any of those messages, to give yourself a way to toggle ‘fullscreen’ on and off. In this patch, we use the escape key (ASCII code 27) to bang a toggle so that we can switch back and forth between ‘fullscreen 1’ and ‘fullscreen 0’ without needing to use the mouse.