Generate MIDI notes

Image


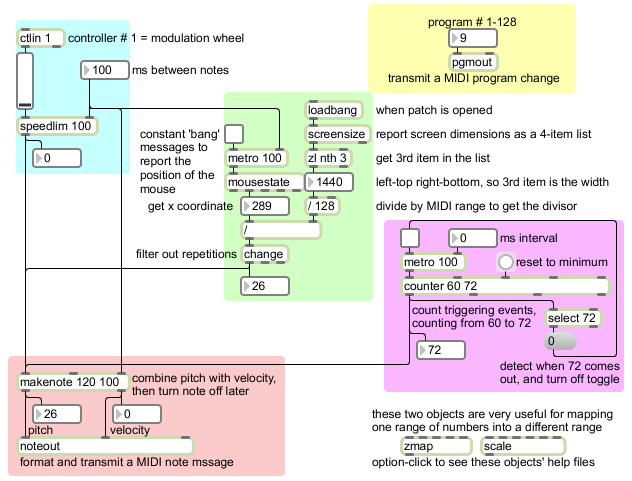
Here are three ways of generating MIDI notes that we discussed in class. Admittedly they don’t result in very interesting music, but they show ways how numbers can be converted for usage as pitch information.

At the bottom-left, in the pink portion of the patch, the makenote object receives numbers in its left inlet, considers them to be MIDI pitch numbers, combines them with a velocity value (supplied either as the first argument typed into the object box or as a number received in the middle inlet) and sends them both out. Using the duration value (supplied either as the second argument typed into the object box or as a number received in the right inlet), it schedules a corresponding note-off message to be sent that many milliseconds in the future; at that time it sends out the same pitch with a velocity of 0. The outputs of makenote are designed to go directly to the pitch and velocity inlets of noteout, which formats a MIDI note message and sends the MIDI to an external destination. You can double-click on noteout to choose the destination device. The simplest thing is to send the notes to the built-in DLS synthesizer of your operating system.

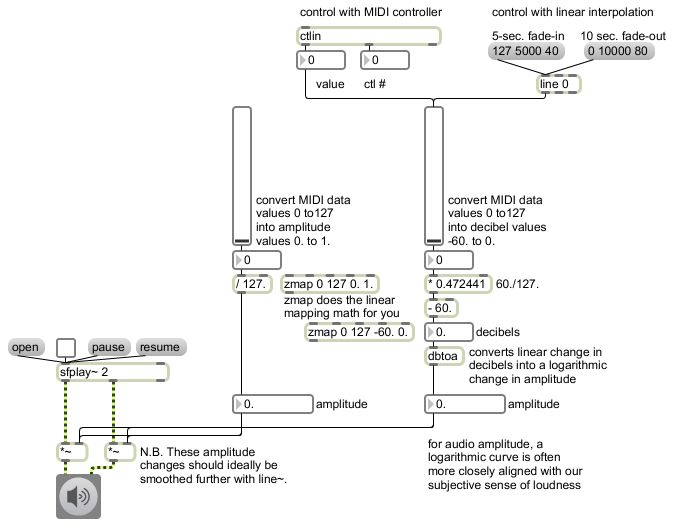
At the upper-left, in the blue portion of the patch, the ctlin object looks only for MIDI continuous controller messages with a controller number of 1 coming from an external source. (You can double-click on the object to select the MIDI source.) Controller 1, by convention, designates the modulation wheel of most controllers. The value of each controller 1 message comes out the left outlet of ctlin and is displayed graphically by the slider. You can also generate such values just by dragging on the slider with your mouse. The range of the slider, by default, is 0-127 just like the range of a MIDI controller value. The speed with which those messages come in is determined by the source device. It’s often quite fast, say, 50 messages per second. To limit the speed of such a rapid stream of numbers to something more like a human note speed, we use the speedlim object. That object refuses to send out more than one number per time interval (specified by a typed-in argument or a number received in its right inlet). Any numbers that come in faster than that will be suppressed. Drag on the slider to play some notes.

As demonstrated in the upper-right (yellow) portion of the patch, you can change the timbre of the synthesized sound by sending a MIDI program change number via the pgmout object.

In the lower-right (purple) part of the patch, we use a metro to send out repeated triggers at a specified time interval, and we use a counter to count the events as they occur. The exact numbers in the count depend on the specified minimum, maximum, and direction values that have been provided to the counter. (See the counter reference page for details.) In this case, we used typed-in arguments to specify a minimum of 60 and a maximum of 72. We use a select 72 object to detect when the count reaches 72, and when that number is detected we trigger a message of 0 to the toggle to turn it off. The result is a one-octave upward chromatic scale. (Pop quiz: By inserting just one object, can you make it play a whole-tone scale instead?)

The central (green) portion of the patch shows one way you could use the position of the mouse to play notes. The mousestate object reports the location of the mouse (its horizontal and vertical offset, in pixels, from the top-left corner of the screen area) out its second and third outlets every time it receives a bang in its inlet. To keep a constant watch on the mouse position, use a fast-paced metro. Here we use a metro with a time interval of 100 ms so that the maximum note speed will be 10 notes per second. But wait! The horizontal range of pixels on your screen is probably much greater than 0-127. The horizontal dimension of your display is likely 1024 pixels, or 1440, or even greater. So the x coordinates reported by mousestate will likely be in a range such as 0-1439. To solve that problem, we “map” the larger range into a smaller range using arithmetic. The screensize object reports the screen dimensions as a 4-item list noting the left, top, right, and bottom limits of the screen (such as 0 0 1440 900). The zl object is a very useful object for all sorts of operations dealing with lists; here we use it to get the nth number from the list, namely the 3rd number which (assuming that the left boundary is 0) will tell us the screen width. We divide the screen width (the range of possible pixels) by 128 (the range of MIDI note values), and we use that number as the divisor for every mouse x coordinate that we get. (Note that by default the / object will perform integer division and throw away any remainder.) That will reduce the range of numbers we can produce with the mouse to a range from 0 to 127, just as we would like. However, that will likely result in many repetitions because the number of possible mouse locations is much greater than the number of possible notes (and because our metro keeps triggering mousestate even when the mouse is not moving). So, to filter out repetitions, we use the change object, which only lets an incoming number pass through if it’s different from the previously received number. Try turning on the mouse-polling metro and playing some notes by moving the mouse on the x axis.

Notice that with the slider (or mod wheel) and the mouse, we’re generating numbers that span the full range of all possible notes in MIDI from 0 to 127. That goes from the lowest note C at about 8 Hz (which technically would be a sub-audio fundamental frequency) up to the G a perfect 12th above the top note of the piano (about 12,500 Hz). That’s a much larger range than we usually use in most musical situations! A more standard traditional range would be approximately from 36 to 96 (cello low C to flute high C), which is the normal range of a standard 5-octave MIDI keyboard. To perform such a mapping in Max (e.g., mapping the range 0-1439 into the range 36-96), you might want to use the object zmap or scale.

Routing MIDI data flow

Image


Managing the flow of data in a program is a common issue. Often you’ll want to receive data from different sources, or send it to different destinations.

To receive data from one of multiple sources, the switch object can be used to pass out the messages that come in just one (and only one) of its inlets at a time, ignoring any messages that may be coming in other inlets in the meantime. The leftmost inlet is the control inlet, used to determine which of the other inlets will be “open” and will pass its messages out the outlet. 0 in the control inlet means all inlets are closed; 1 means that the 1st of the other inlets is “open”, and so on.

The gate object is a counterpart of switch. Its left inlet is the control inlet, just as with switch. The number received in the left inlet determines which outlet will be “open”, and gate will pass messages from its right inlet to that open outlet.

These patches demonstrate how switch and gate can be used to manage the flow of MIDI data in a patch. In the upper left, the switch object allows us to choose which source of MIDI data we want to pay attention to — the data coming from the midiin object or the data coming from the seq object. In the upper right, a gate object allows us to direct the data from midiin to one of three different subpatches. This potentially allows a single program to process incoming MIDI data in one of several different ways (in different subprograms).

The principle, in each case, is for a single program to be able to do different things, to process information differently, at the flip of a switch.

Notice one little potential problem. If we cut off a flow of MIDI messages, there is always the chance that we might interrupt the flow of data between a note-on message and its corresponding note-off message, resulting in a stuck note. The patches in the lower part of the example demonstrate reasonable precautions to protect against such stuck notes occurring.

The midiflush object is designed to turn off held notes. It keeps track of each MIDI note-on message that passes through it until it receives a corresponding note-off message. Thus, it always has in its memory all the held notes that have not yet been turned off. When it receives a bang, it sends out a note-off message for any remaining note-ons.

In each of the two lower patches, we check to see when the control inlet of the switch or gate object is changed, by using the change object. (There will only be output from the change object when its input actually changes.) When it does change, we send a bang to midiflush to turn off any notes that are held at the moment. Notice that in the patch on the right it’s important to send the bang to midiflush before switching the outlet of gate, to make sure that the note-offs go out the proper outlet.

Drawing with MIDI Notes

Image

Drawing with MIDI notes.


Key number data (pitch information) from a MIDI keyboard can be used to trigger and/or control events in Max, such as drawing a colored shape. First the data is mapped into the appropriate range to describe a horizontal pixel coordinate in a drawing space( e.g., pixel 0 to pixel 240). Then it is used as the left corner coordinate (and a number 16 greater than that is used as the right corner coordinate) for a ‘paintrect’ message to a lcd object.

Note the use of the stripnote object to suppress note-off messages (note-on message with a velocity of 0) so that a rectangle is drawn only when a key is pressed, and not when it is released. The split object is used to limit the range of notes that it will try to draw (only the most commonly-used notes, those of a standard 61-key MIDI keyboard). The valid key numbers are first used to trigger a ‘clear’ message to erase the previous contents of the drawing space, then to a + object to get 16 added to them, then to a pack object. The pack object is used to combine two numbers together into a single message known as a ‘list’ (a message that starts with a number and has other space-separated items after that). The ‘list’ goes to a message box that contains a properly formed ‘paintrect’ message with fixed top and bottom coordinates (120 and 136) and that uses the two items of the ‘list’ from the pack object as its left and right coordinates. The lcd object then paints a rectangle using the desired color (black by default). The ‘color’ message uses colors from a palette of 256 preset indexed colors, with 0=white and 255=black.

Linear Mapping of MIDI to Amplitude

Image


Data from a MIDI continuous controller (such as a mod wheel or a volume pedal), and/or from a Max slider object, can be used to control the amplitude of an audio signal. First the data is mapped into the appropriate range (e.g., 0 to 1), then it is used as a multiplier for the audio signal.

Note that to be truly correct, the data should go to a line~ object to interpolate sample-by-sample to the new amplitude over a very small amount of time (say, 20-50 ms or so) before going to the *~ objects. That step is omitted from this program just to simplify. You can see an example of this use of line~ in the example from April 5, 2006 called “Simple audio file player”.

Linear mapping can be achieved by a multiplication to resize the range and an addition to offset the range. The zmap object (shown but not used) can do this for you. Linear interpolation over a period of time can be achieved by using the line object for Max messages (as shown in the upper right corner) or the line~ object for audio signals (not shown in this example).

To read more about linear interpolation and linear mapping, see also Dobrian’s blog chapters on linear change and fading my means of interpolation.

MIDI Objects

Image

All the most useful MIDI objects provided in Max.


This allows you to see all the most useful MIDI objects in Max collected together in one window. If you don’t know what a particular object does, option-click (or alt-click) on it to see its help file. You can send MIDI into this patch to see what kind of data it is. You can connect the midiin object to a print object if you want to see every single MIDI byte coming in.

By default, the input objects get their data from all connected devices. By default, all the output objects send their data to the first device in the list of available devices. To choose a specific MIDI device for either input or output, double-click on the object and hold the mouse down, and then choose a device from the resulting popup menu.