Links for reading about MIDI

MIDI“, an explanatory essay by Christopher Dobrian.

Wikipedia entry for “MIDI”.

A short essay by Tom Igoe on MIDI provides some technical information concisely and clearly.

A pretty thorough-yet-readable explanation of MIDI messages can be found in The MIDI Companion by Jeffrey Rona, much of which is available online on Google Books. For understanding common types of channel messages such as note-on, take a look at the chapter titled “Channel Voice Messages“.

Website of the Music Manufacturers Association (MMA).

A summary of all MIDI messages provided by the MMA.

Binary number representation“, a brief introduction and pointer to the web page “Representation of Numbers” by Erik Cheever. (Read at least the first two sections.)


Arpeggiate the harmonic series

This example repeatedly arpgeggiates the first 16 notes of the harmonic series based on the frequency 65.406395 Hz, which is the fundamental frequency of the open C string on a cello. The note rate can be adjusted anywhere from 1 note per second to 100 notes per second. The default initial rate is 8 notes per second.

Play 16 harmonics of low C

Here’s some explanation of the objects, from bottom to top.

dac~ transmits MSP signal to the computer’s DAC to be heard. It can also turn MSP processing on or off.

loadmess sends out its argument(s) as a single message as soon as the patch is loaded (right after all the other objects have loaded). Here it’s used to start MSP processing in the window as soon as the patch is opened, by sending the message ‘startwindow’ to the dac~.

live.gain~ is a volume control fader that numerically displays the amount of amplitude change it’s causing (in decibels) and also graphically displays the amplitude of its output as a stack of LEDs like an output meter on a mixing console. You can control it by dragging on the fader arrow with the mouse, or by sending a numerical message (int or float) in its inlet. Based on the number of decibels specified, it multiplies all the samples of a signal by the desired factor and passes the scaled signal out its outlet(s). Internally it interpolates over the course of 10 ms to get to any new specified level, to avoid clicks. In the object’s Inspector, you can change that interpolation Ramp Time if you want, you can change the Short Name to whatever you want displayed as a label for the fader, you can specify the number of Channels of signal you’ll want it to control, and you can specify an Initial Value for the fader by setting the Initial Enable option in the Inspector and setting the Initial Value you want. In this example, the number of channels (the ‘channels’ attribute’) is set to 1, the Short Name label is set to 1, and the Initial Value is set to -24 dB (a relatively low amplitude, so the sound won’t be too annoying).

*~ controls the amplitude of the audio signal before it ever gets to the live.gain~ fader. It functions as the basic sound-on/sound-off control for this sound (triggered by the toggle at the top of the patch).

line~ provides linear interpolation smoothing for the sound-on/sound-off switching. Rather than switch the multiplying factor of *~ instantaneously between 0 and 1, which would cause a click, line~ ramps to the new level smoothy over several samples of the audio signal. It expects to get two values, which may arrive together as a two-item list in its left inlet; in that list, the first item is the destination value line~‘s output signal should go to, and the second value is the amount of time, in milliseconds, it should take to get there. Once it gets there, it stays constant until it gets another message in its inlet.

message box contains the message for the line~ object, which should be a two-item list: destination value and ramp time. But what’s that ‘$1’ business? In a message box, the term ‘$1’ means “Put the first item of the input message here, then send out the resulting message.” So, for example if the message ‘0.5’ comes in, the message box will put the 0.5 in place of the $1 and send out ‘0.5 25’. (In this case the incoming message only had 1 item, but even if it were a list of several items, its first item would be put in place of the $1 in the outgoing message.) Knowing that, you can figure out that the toggle at the top of the patch will cause messages ‘1 25’ and ‘0 25’ to go the line~ object, causing quick 25-millisecond fades in and out when the toggle is switched on or off.

saw~ produces an anti-aliasing (band-limited) sawtooth-like waveform. An ideal sawtooth waveform has energy at all harmonics of the fundamental, which could result in audible aliasing of the higher harmonics, whereas saw~ diminishes the amplitude of the upper harmonics as they approach the Nyquist frequency.

* has a multiplier argument of 65.406395, which is the fundamental frequency of low C below the bass clef staff (cello low C). You can obtain the frequency of any of the harmonics of that fundamental by multiplying the fundamental frequency times a positive integer such as 1, 2, 3, etc. Those resulting frequencies are used here to set the frequency of the saw~.

counter counts the number of times it has received a ‘bang’ (or an int) in its left inlet, and it sends the count out its left outlet. When it has two typed-in arguments, it uses those as its minimum and maximum count values, and after it reaches the maximum it loops around and starts again at its minimum. So this counter will count repeatedly from 1 to 16.

select looks for a specified number (or any number of specified messages, actually) in its inlet, and sends a bang out the corresponding outlet when it receives the number it’s looking for. When this select object gets the number 1 it sends ‘bang’ out its left outlet. That ‘bang’ sets the counter to its minimum so it will start counting at 1 each time the toggle is turned on.

metro sends out a ‘bang’ when it’s turned on (by a ‘bang’ or a nonzero number in its left inlet) and continues to send out bangs at regularly scheduled intervals (specified in milliseconds by its ‘interval’ attribute or by a number in its right intlet) until it’s turned off (by ‘stop’ or 0 in its left inlet).

live.numbox is similar to its Max counterpart numbox, but it behaves more the way number boxes do in the Ableton Live application. It has a somewhat different look from the Max numbox, and it has the ability to send out its Initial Value when the patch is loaded (without the use of loadbang or loadmess) if its Initial Enable option is set in its Inspector. Here its Initial Value is set to 125 in the Inspector, so when the patch is opened it immediately tells the metro that its time interval should be 125 milliseconds (1/8 second). In the Inspector its minimum and maximum values have been set to what seem like reasonable extremes, from 10 (an interval of 10 ms results in 100 notes per second triggered by the metro) to 1000 (1 note per second triggered by metro).

toggle switches its output between 1 and 0 each time it’s clicked upon. When it’s clicked for the first time, it sends out 1 which first resets the counter (via the patch cord going to the select object), then starts the metro (which bangs the counter which sends 1 to the * which sets the frequency of the saw~ to 65.406395), then it goes to the message, which constructs the message ‘1 25’ to fade the sound in quickly with line~ and *~. The next time the toggle is clicked, it stops the metro and turns down the amplitude of the saw~ to 0.

There are several ways to turn MSP on and off

Did you know that there are several different ways to turn MSP audio on and off in Max?

In order for Max to compute audio, it’s necessary to explicitly turn MSP on. You can read about the reasoning behind turning MSP on and off if you want; this post will show you the various ways to do it.

1. The easiest way to turn MSP on and off is with the ezadc~ object or the ezdac~ object. Just put one in your patch and, voilà, you’ve got an on/off switch for MSP computation. Once the patch is locked, you can turn audio on/off by clicking on one of those objects.

2. You can also turn audio on with a ‘start‘ message to one of those objects and turn it off with a ‘stop‘ message.

3. You can also turn audio on and off with an integer (‘int‘) message to one of those objects. Any nonzero integer will turn MSP on, and 0 will turn it off. N.B. Interestingly, unlike most Max objects, these objects will not convert ‘float‘ to ‘int‘. If these objects receive a message of type float such as 3.14, rather than truncate the number and convert it to an int, they’ll simply report “doesn’t understand ‘float'” in the Max Console window.

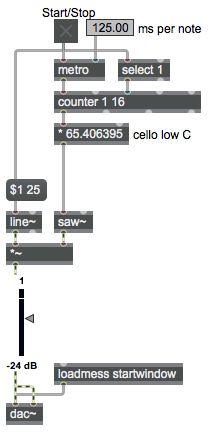
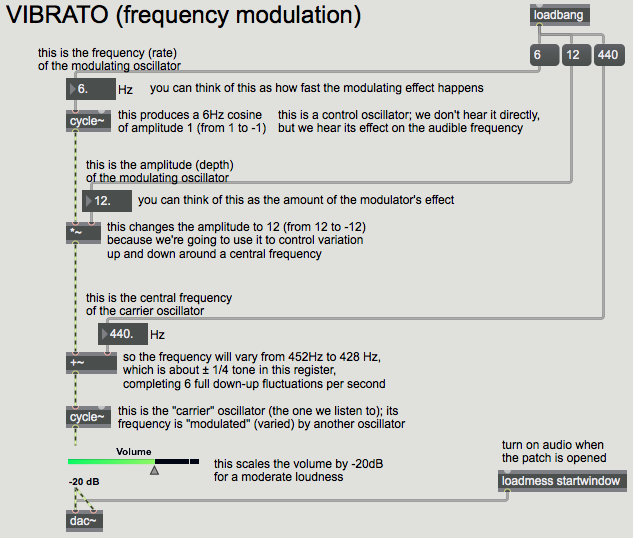
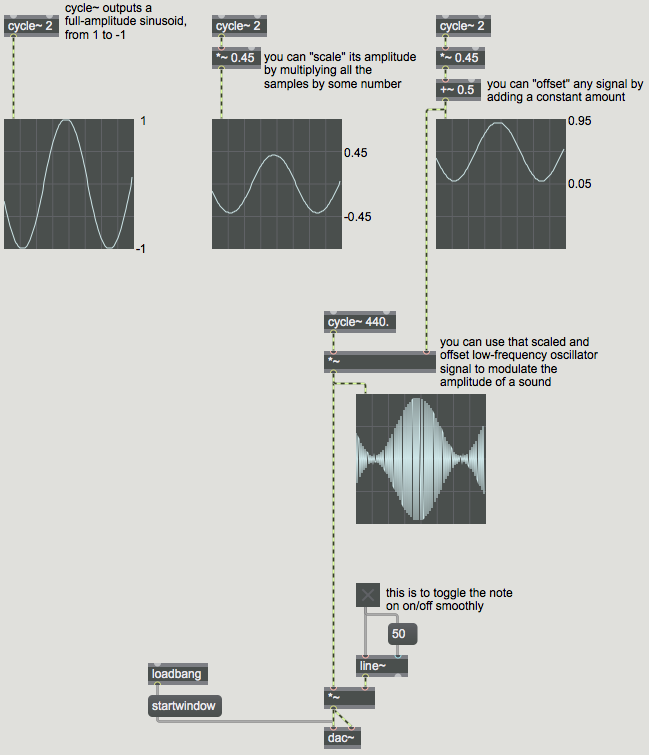
4. Normally when MSP is on, it’s on in all loaded patches. The message ‘startwindow’ to either of these two objects, however, will turn on audio only in the patch where the message was received (and in subpatches of that patch), and will stop audio in all other patches.

N.B. In Max 7, the ezadc~ and ezdac~ objects each have a ‘local’ attribute. When that attribute is enabled, the mouse-click behaves like ‘startwindow’ and ‘stop’ instead of ‘start’ and ‘stop’.

5. The above methods 2, 3, and 4 apply equally well using the plain ol’ adc~ and dac~ objects. Those objects don’t provide the user-interface characteristics of their ezadc~ and ezdac~ counterparts, but in terms of the messages described above they behave identically.

N.B. Another important distinction is that the user-interface objects ezadc~ and ezdac~ are fixed at 2 channels of signal input/output communicating with channels 1 and 2 of the audio interface; adc~ and dac~ are also stereo by default, but they can be set to communicate with any number of specific channels of the audio interface depending on the typed-in channel arguments. That capability is essential for addressing specific channels of a multi-channel audio interface.

6. The adstatus object reports and/or sets different aspects of MSP. What it reports or sets depends on the argument that you type in after the object name. The argument switch refers to MSP’s on/off status, so an object adstatus switch allows you to report or set the on/off status of MSP. In either of its inlets, a nonzero integer turns MSP on, and 0 turns MSP off.

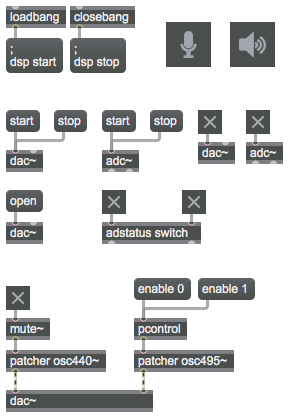
7. It’s a relatively unknown or at least underappreciated fact that a message object can send a message to any receive object by starting its message with a semicolon and the name of the receive object. This is a “Did You Know?” bit of knowledge, of the sort that’s well known to some people and completely unknown to others. Well, did you know that you can send a message to MSP itself using a message box, by starting its message with a semicolon and the word ‘dsp’? Thus, triggering a message box that contains the message ‘; dsp start’ starts MSP, and triggering a message box that contains the message ‘; dsp stop’ stops MSP.

8. In the Audio Status window, there’s a button to turn MSP on/off. You get to the Audio Status window by choosing Audio Status… from the Options menu, or by sending an ‘open’ message to any adc~, dac~, ezadc~, or ezdac~ object.

9. In Max 7 each patcher window has an Audio On/Off button in the bottom right corner. (The button is disabled until the patch contains at least one MSP object.)

In addition to all of those methods of turning MSP on and off, there are a few ways you can turn off MSP selectively in certain subpatches (patcher objects) or abstractions (other patches loaded in as objects in a main patch). The next three items address some of those methods.

10. You can disable/enable the audio and MIDI capabilities of a subpatch or an abstraction by attaching a pcontrol object to the subpatch’s left inlet and sending a message ‘enable 0’ or ‘enable 1’ (or any nonzero number) to the pcontrol object.

11. You can disable/enable the audio capabilities of a subpatch or an abstraction by attaching a mute~ object to the subpatch’s left inlet and sending an int to mute~: any nonzero int will mute the attached subpatch, and 0 will unmute it.

Note that “muting” is conceptually the opposite of “enabling”, so methods 10 and 11 above work in opposite ways. Think of the 0 and the nonzero numbers as meaning “no” and “yes” respectively. So the message ‘enable 0’ to pcontrol means, “no, don’t enable the subpatch”, whereas the message “1” to mute~ means, “yes, do mute the subpatch”.

N.B. The use of mute~ and pcontrol to turn MSP computation on/off in a subpatch or abstraction is officially “deprecated” by Cycling ’74. That means that the company doesn’t guarantee that those methods will work in future versions of Max, so your patch may no longer work properly if Cycling ’74 stops supporting that feature. So far, as of Max 7, these methods continue to work fine. But you’ve been warned. For the Cycling ’74 approved way of muting subsidiary parts of a patch selectively, see method 12 below.

12. The poly~ object is a container for multiple instances of a subpatch. It’s intended to facilitate polyphonic use of multiple instances of the same subpatch, and it allows each instance of the subpatch to be muted independently with a ‘mute 1’ message and unmuted with ‘mute 0’. So when you need to stop and start computation within a subpatch, even for muting and unmuting a single instance of a subpatch, encapsulating it inside a poly~ is the preferred method.

(13.) This last method isn’t really about turning MSP on and off, but it’s useful knowledge for listening to different parts of a multi-patch signal network. In Max 7, you can create a Solo button and/or a Mute button for any patcher window. In the bottom right corner of a patcher window, you can right-click (or Control-Click in Mac OS) on the Audio On/Off button, which will present you with a popup menu that allows you to create a Solo button and/or a Mute button. Those buttons work as you might expect, just like comparable buttons on an audio mixer. The Mute button will silence (but not actually stop the computation of) all audio being sent to any dac~ or ezadc~ object in that particular patch. The Solo button will silence (but not actually stop the computation of) all audio being sent to any dac~ or ezadc~ objects in all other patches.

Conclusion

If your Max program does anything with audio, it should simply (automatically) turn audio on immediately and leave it on.

Somewhere in your patch you should automate one of the above methods of turning MSP on. The method that involves the fewest objects is to use a loadbang object to trigger a message box containing the message ‘; dsp start’. Place that in your main patch, and (provided you have at least one MSP object in the patch) audio processing will always be underway.

You can see an example patch showing many of the ways to turn MSP on and off.

Turning audio on and off in Max

Background

The Max program, as it was released commercially in 1990 and existed for most of the ’90s, consisted of objects and messages, including some objects designed for the transmission, reception, and management of MIDI data, but it wasn’t capable of directly processing audio data. That capability had to wait till personal computers became faster, specifically until Apple introduced the Power PC chip in its Macintosh computers in the mid-’90s.

An audio processing extension of Max called MSP (Max Signal Processing) was introduced in 1997. In addition to the event-based and message-based paradigm of Max, MSP introduced new objects that use a special ‘signal’ message, which defines a network of audio processes that operate on the individual samples of audio signals stored in memory. That is, MSP objects that send or receive the message ‘signal’ are linked together to define an algorithm for constantly processing the thousands of numbers per second that describe an audio signal that can be played by the computer’s DAC or an attached audio interface. MSP objects are distinguished by the fact that their names all end with the tilde character ‘~’. (Like a sine wave, get it?) The patch cords that carry the ‘signal’ message are yellow-and-black striped, to distinguish them from ordinary Max patch cords that convey other, individual messages such as single numbers, lists of numbers, words like ‘start’ and ‘stop’, etc.

Normally, Max is sitting and waiting for an event such as a keystroke, a mouse click, or a MIDI message that will trigger messages to be passed from one object to another. MSP, however, is constantly computing the thousands of numbers per second necessary to produce a digital audio signal that can be played by the DAC. That represents a lot more work for the CPU, so you’re given the option to turn MSP on only when you need it. But given the power of modern CPUs, it’s not really that much of a burden for Max to compute audio, unless your program is making really extremely computationally-intensive demands. So there’s usually no reason you can’t just leave MSP on all the time.

Some more technical background info

What’s really happening when you turn MSP on?

One thing that happens when MSP is turned on is that Max sets up an arrangement with the computer’s operating system (Windows or Mac OS) to pass audio information back and forth. The operating system will take care of getting audio from the computer’s input jack and converting it into numbers with an analog-to-digital converter (and/or the computer will get numbers from an attached audio interface that does the analog-to-digital conversion task), and passing those numbers to any application that has said it needs audio input. The operating system also accepts numerical audio data from applications that are outputting it, and sends those to a digital-to-analog converter (DAC) for audible output by speakers.

For that to work, the Max application has (under the hood, where you don’t have to worry about it) special functionality called “callback” functions that communicate regularly (very often, in fact) with the operating system to arrange the passing of audio data. For Max to process incoming audio data in real time (that is, with no discernible delay), it needs to be receiving small amounts of new data constantly. Max gets data from the operating system in chunks of a few hundred numbers at a time—just a few milliseconds at a time—so that it can be constantly number-crunching with only a few milliseconds of delay. You can think of Max’s input callback function, then, like a virtual conveyor belt that brings a constant supply of new material for MSP to do its work. Max is constantly asking the operating system for more audio data, the operating system says “here ya go” and provides the most-recently-received numbers from the ADC, and that handoff repeats at regular intervals every few milliseconds.

In a comparable way, on the output end, the operating system is constantly needing more audio data for the DAC, and Max’s audio output callback function is constantly providing the latest data computed by MSP.

The other thing that happens when MSP is turned on is that every MSP object sends the message ‘signal’ out any outlet that is intended to produce audio signal. You can think of that as an information-gathering moment that permits Max to construct a “signal network”, a kind of a formula for all the operations it will need to do, and the order in which it will need to do them, to compute the desired audio. Another way to think of it is that Max is determining the signal path by which audio data should virtually flow from one object to another. In short, when MSP is turned on, the signal network is quickly compiled, the audio connections with the operating system are established, and the audio data computation (input and/or output) begins.

Each time you as a programmer change something about the MSP signal network, by adding or deleting a new MSP object or by changing patch cord connections between signal outlets and inlets, Max briefly turns audio off, recompiles the signal network, and turns audio processing back on.*

 When to turn MSP on

In most applications that deal with audio, you as an end user don’t have to be very concerned at all with how the application is passing audio data back and forth with the operating system, how its callback functions work, and so on. That’s all taken care of by the programmers who wrote the application, and they hide any such concerns from the end user. The user should just need to indicate what s/he wants to do (play audio, for example) and it’s just supposed to happen. In Max, because it’s a programming environment (an application for programming other applications), you as a programmer need to be concerned with it at least to the extent of starting and stopping the entire audio computation process. Even so, if you’re writing an application to be used by other people, there’s no reason to bother them with such matters, so you should just set up the audio behind the scenes.

Because Max is a programming environment and a program-running environment at the same time, Max provides ways to turn MSP on and off, including even a couple of slick-looking user-interface objects for doing so: ezadc~ and ezdac~. But, IMHO, for the most part that’s not a task that the end user of a Max patch should need to deal with, so in most cases the starting and stopping of MSP should be automated and should take place behind the scenes of the user experience. There’s not really any compelling reason why MSP shouldn’t be on all the time if your Max patch is dealing with audio. By default, the Max application opens with MSP turned off. Therefore, if you’re making a patch that deals with audio, it’s usually best just to turn MSP on automatically when the patch is opened.

There are several ways to turn MSP on and off.

Enable Mixer Crossfade

* There’s an option in Max’s application preferences, accessible by choosing Preferences… from the Max menu, called “Enable Mixer Crossfade”. If that option is turned on, Max actually keeps a duplicate copy of the old signal network before it compiles the new version of the signal network, and it continues to run the old network while it computes the new one. That avoids the noisy clicks that could occur due to recompiling the signal network while audio is playing, at the expense of some redundant work for the computer and some (very slight) delay because of the  time necessary to crossfade between old and new signal chain.

Counting and stopping

How do you do something x number of times, then stop?

The question is discussed in detail in a post titled “Timed counting” on the Algorithmic Composition blog.

The example shown below counts and performs 8 snare drum notes, then stops. The tempo of the snare drum notes can be specified by the user in terms of beats per minute, which the program converts into a number of milliseconds per interval between note onsets, because that’s the form of information that the Max metro objects needs to determine the rate at which it sends out the message bang.

Count to 8 and stop

The counter object with no arguments starts counting from 0, and has no specified maximum. If the counter has one argument, that number is considered its maximum; it still starts counting from 0, but once it reaches its maximum, the next count will go back to 0. If the counter has two arguments, as in this example, the first argument is the minimum and the second argument is the maximum. The goal in this case is to count eight things, from 1 to 8, and detect when the eighth event has occurred; thus, the two arguments 1 and 8 produce the desired behavior.

Assignment for January 20, 2015

1. Using what you know about playing sound files or sound cue excerpts of files with sfplay~, and what you know about synthesizing sounds using oscillators such as cycle~, saw~, rect~, and tri~, and controlling those sounds by modulation with low-frequency oscillators such as cycle~ and phasor~ and/or linear control signals from line~, and what you know about timing using metro and/or LFOs, make one or more rhythmically changing sounds that you consider to be truly musically interesting and engaging.

Create a simple but effective user interface that allows the user to start and stop your sound(s). Your interface might also give the user a way to exert some additional control over the sound, but that’s not really necessary because the majority of the interest should be generated automatically by the way you’ve programmed the sound characteristics.

The main points of this assignment are a) to get experience combining those objects and finding the ranges and combinations that achieve the sort of effects you find interesting, and b) exercise your creative imagination to think of how sound can be modified and/or triggered rhythmically to make interesting “musical” results (musical in the sense of exhibiting some sort of organization and aesthetic quality).

Place your completed assignment, including any additional media files that might be needed to make it work properly, in the EEE DropBox called “RhythmicSound2”.

For examples, ideas, and inspiration, you might look at:
Modulating oscillator
Using phasor~ directly as a control signal
Sine wave as control function
Pulse wave, a binary control function
Control function as a recognizable shape

2.Writing on your blog is implicitly always part of the assignment. Continue to take lots of notes on your website about what you learn, discoveries you make, and tricks of programming or Max that you pick up.

When you have something you believe is a true statement or definition that you can contribute to the class Wiki, go to the Wiki and either add to an existing page or add a page of your own and enter the information like an encyclopedia entry.

When there’s a question or problem to which you have tried but have been unable to find the answer, post the question or problem to the class Q&A site. You’ll most likely get a response from others in the class very quickly.

As you’re working in Max, make much use of the help files by Option-clicking (Alt-clicking in Windows) on objects and by reading the Max Documentation. In addition to the help files, there’s a detailed reference page for each object, and additional instructional texts about many Max topics. In addition to being available in the Help menu of the Max application, all of the documentation of Max 7 is available online.

There are many other ways to learn about Max, many of which are listed on the Links page, including video tutorials by several individuals and a user’s forum supported by Cycling ’74.

Vibrato

In music the term vibrato (Italian for “vibrated”) means small repetitive fluctuations of pitch and loudness in a tone. Singers and instrumentalists use vibrato intentionally to add interest and expressivity to their sound.

In computer music the term vibrato refers to repetitive fluctuations of frequency (not amplitude), most commonly achieved by means of frequency modulation—using the output of a low-frequency oscillator to modulate (vary) the frequency of an audio-frequency oscillator. A separate term, tremolo, (derived from tremolando, Italian for “trembling”) is used for repetitive loudness changes due to amplitude modulation.

Thus, in computer music we make a distinction between vibration (frequency) and tremolo (amplitude), whereas in physical instruments the two are commonly combined and synchronized for expressive effect.

This example demonstrates and explains how to program the effect of vibrato by means of frequency modulation by an LFO.

Vibrato

Scale and offset

There’s a simple way to convert one range of values into a corresponding set of values in a different range. The mathematical operations necessary to do that are “scaling” (one multiplication) and “offsetting” (one addition). For example, if you have a values in a range from -1 to 1, and you want to convert those to a corresponding set of values in the range 0.05 to 0.95, you can multiply (scale) the values all by 0.45 so they now range from -0.45 to 0.45, and then add to (offset) all of them 0.5 thus pushing the range up to 0.05 to 0.95.

These two operations—scaling and offsetting, one multiplication and one addition—are super-useful for moving numbers to a different range, something one needs to do often in programming.

In this example, we take the output of a sinusoidal LFO (low-frequency oscillator), which in MSP is in the range -1 to 1 from a cycle~ object, and move that into the range 0.05 to 0.95, which is more useful for amplitude modulation to create a deep, slow tremolo effect. Tremolo is a slow repetitive modulation of the amplitude of a sound signal, thus varying its loudness.

2 Hz tremolo effect


Hide or show an object

A way of hiding or showing Max objects is to assign an object a “scripting name” in the Inspector, then give the thispatcher object a ‘script’ message telling it to hide or show that object.

Scripting a behavior with thispatcher

Put this patch in Presentation Mode and try it out.