The ‘alpha’ attribute of a picture

In digital images, each pixel contains color information (such as values describing intensity of red, green, and blue) and also contains a value for its opacity known as its ‘alpha’ value. An alpha value of 1 means totally opaque, and an alpha value of 0 means totally transparent. This value can be used for blending images, or for making all or part of an image totally transparent.

The fpic object has an attribute called ‘alpha’, the value of which determines the opacity of the whole image in the fpic object. By default its ‘alpha’ attribute is set to 1, totally opaque. You can change that alpha value to 0, making the image totally transparent, effectively hiding it.

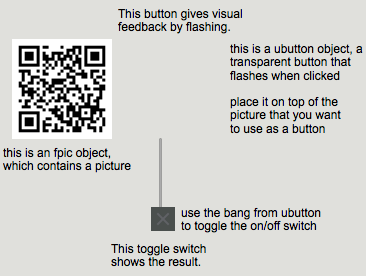
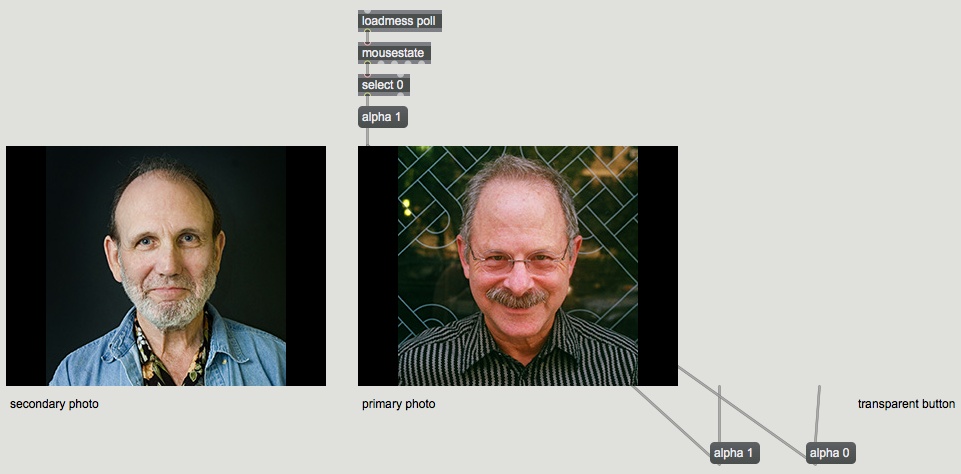
This example shows how you can use the ‘alpha’ attribute to make an image seem toggle between two different pictures. The trick we use here is to stack two different fpic objects on top of each other in the Presentation, and then change the ‘alpha’ attribute of the top picture to make it transparent, revealing the second picture underneath it. To do that, we put a transparent ubutton object on top of both pictures, so that when a user clicks on it we can hide the top picture, and when the mouse is released we can show it again.

Hide a picture to reveal another

Put the patch in Presentation Mode and click on the picture to see the result.

In this case, in the ubutton object’s Inspector, we set the object’s ‘hilite’ attribute to 0 so that it wont flash. The change of the picture will be enough visual feedback for the user.

One little potential problem, though, is that if the user drags off of the ubutton before releasing the mouse button, the mouseup message (the release of the mouse button) is never detected by the ubutton. So we added a mousestate object to reset the alpha of the image to 1 whenever the mouse button is up.

Flashing picture as a button

The button object in Max gives visual feedback when it’s clicked upon, by flashing once briefly. If you’re using a picture (an fpic object) to serve as a button and you’d like it to give that same sort of visual feedback when clicked, you can cover the fpic object with a ubutton object, which behaves rather like a button but becomes transparent when the patch is locked.

Set up a flashing picture using ubutton

This is what it will look like in Presentation Mode.

The picture flashes when clicked.


Sinusoid, circle, and simple harmonic motion

Shauna Toh posted an instructive animated GIF from Wikipedia of the relationship between simple harmonic motion (e.g. and object bouncing up and down on a spring, a pendulum swinging back and forth, etc.) and cyclic circular motion.

And on a page on The Sine Function on the TechnologyUK site, there’s an instructive animated GIF (near the bottom of that page) of the relationship between points on a sinusoid and points on a circle. That animation shows how the angle of the point on the circle from the origin of the circle changes as the point moves around the circumference of the circle at a constant velocity, and it shows how plotting the sine of that angle results in the familiar sinusoidal shape.

Gord Anderson has a similar animation on his Quantblog WordPress site.

Assignment for January 15, 2015

Study the two types of control signal discussed in class: the low-frequency oscillator (LFO) and the linear ramp.

Read the essay titled “Line-segment control function” in Christopher Dobrian’s blog on Algorithmic Composition. You don’t need to follow the links that reference other chapters (unless you want to), but do try to understand the new (italicized) terms that are introduced, and do try out the example Max patch in that essay, try understand how it works, and read about any objects or messages in it that you don’t understand.

Then study the rather simple examples “Synthesize a sinusoid in MSP“, “Vibrato“, and “Linear control function“.

Read two other essays in the Algorithmic Composition blog that discuss the use of “Classic waveforms as control functions” and the “Sine wave as control function“.

And if you want still more examples and explanations, you can check out “Amplitude envelope with the function object“, “The function object“, and “Line segment control functions“.

Int and Float

Did you know that some Max objects make a distinction between integer numbers and numbers that have a fractional part? It’s often important to remember this, and to specify the kind of number you’re using, so that calculations in your program will be made correctly. (You can cut to the chase if you don’t want to read the full explanation.)

An integer is a number that has no decimal point or fractional part, such as …-3, -2, -1, 0, 1, 2, 3… etc. These numbers are most commonly stored in the computer’s memory with a particular data type called “long integer”, which sometimes shortened to “long” or just “int“.

Numbers that have a fractional part, or even that just have a decimal point—such as 3.1416 or 0.999999 or -7.—are usually stored differently in the computer’s memory, with a method called “floating point”, which is usually shortened to “float“.

The important thing to know for the purpose of programming in Max is that these two types of numbers exist as two separate types of message in Max. You can read about the main types of different messages in Max in the article excerpted from the original Max manual, called Rudiments of Max.

Objects that expect to get a message of type ‘float’ in their inlets can usually handle ‘int’ messages just as well; the object will simply convert an ‘int’ (such as -7) into a ‘float’ (such as -7.000000). However, some objects expect to get a message of type ‘int’ in a particular inlet, and if they get a ‘float’ number instead, they simply “truncate” (i.e. chop off) the fractional part. For example, the number 3.1416 would get converted to 3 by such an inlet. If you don’t know about that fact, you might be sometimes mystified by what seem to be miscalculations by the computer.

The most common way you might encounter this is when you use the math operator objects such as +, , * (times), and /. By default, those objects expect to use ‘int’ messages. For example, notice what happens in this program.

Multiplication of integers; floats are truncated (by default)

Fortunately…

Here’s how to multiply floats instead of ints:

If we want to ensure multiplication using floats instead of ints, all we need to do is include an argument in the * object that contains a decimal point. The typed-in argument sets the initial value for the right inlet of math objects such as *, and if the argument contains a decimal point, the object will use floats for its calculations instead of ints, and will send out a float result.

N.B. All MSP objects (objects that handle audio data and end with a ~) use only floats for all their calculations.

Multiplication of floats, caused by float argument


How to Send a Max Patch by Email

You can send a Max patch (or any selected objects from it) to someone else as plain text in an email (or a post like this) by following these steps.

1. In Max, while in Edit mode, select the objects you want to include (or type Command-A to Select All).

2. Choose ‘Copy Compressed’ from the Edit menu.

3. Go to the program where you want to include your patch and choose ‘Paste’ from the Edit menu.

The text that you paste in will look something like the text shown at the bottom of this post. When you receive such text from someone else, to turn it back into a Max patch, follow these steps.

1. Copy the weird-looking text, including the lines that say

———-begin_max5_patcher———
and
———–end_max5_patcher———–

but not the lines that contain the HTML tags ‘<pre><code>’ and ‘</pre></code>’.

2. Go to Max and choose ‘New From Clipboard’ from the File menu.

Try it yourself. This will be a common way for you to send and receive Max patches.

<pre><code>


----------begin_max5_patcher----------
736.3ocuV00biBBE8Y8WAiOmMUIpIous+N5zICQIV5hfKfoIsS6u8kuzjtIs
Shwo9fHW.u2y4d3BuEFDsluCKi.2Cd.DD7VXPf0jwPfuePTMZWAEIsSKpfWW
iYpnItwT3cJqcFeJfuAfZKIbPwSHFCSkcyZCmoXnZrcl+VPPztQZPphmHrpU
BbgxEGv33owS.I4KrMvLSCTaC7neQr1ZBihU1HJ4fQdqpyZr2Joz5S95m+EL
83vQRd0FNIvowFquGFZdM4FoAdClAP.IukUB1Pn3AQAyRltz7jsr6QSDwoV9
HFNV7A7GfOb5AN6N9lMChJRRsvFBsMymMVfOdDAO90RTwGeGHxcR5EVPjl08
97f.dofHIOZ.QaMVJQU3yJcGTJJ2ILgVLNatKcccfK4Lf6KyPdytkq12fcgQ
TD3wQT4JUHg5Noh2bK5V+tVW9eDzsK+wpgoqe0PQ60e3KpO3pYKyMfegaKPV
5HwDyGQlPwqpN.tuYCLrOOd8X3LZ77CtTnYSEVrByPqo3iw7I5bhNmMHoNC+
h1qmpz2XRze.fCSn6olL64Ry0mbMeNLKu6fqzquXvrSIprqsVfjTwLg8wesF
wph5CDIZKtbk9mqQxJjRIHqaUt6BEzyeZFEIIEpVFwr16AoodWZBEJk+REku
FQU35F9QIMynhZDSUvEFphvYeZzZdoics+9nNybAohniVJlUodxAEK6FoHE+
Q1G7GlYuicRS+nMDcZ5Kb8eaQThZ+Y7thnOZPIv505csSk4jYchMaLDQIr++
diVsgw9mUf5qBIJ5RKdQO3fdnT6RMP5ByG5y2cd+DM9k5GyAHWpi7yolT1v0
au7HSeairI1J4ll7k88twHK6BBrj7QfBLNJ4RbTxmbjKEiZZ1hER+rs9PWN4
YtvzcwDaWBy00VaKRf2R5lep0BRnKWnzpvVgSuuK2cKb6N.AqkXWcnAcZWZK
UYp7HaPE9MH5JZguG9O.Cr79vC
-----------end_max5_patcher-----------

</code></pre>

Opening in Presentation Mode

Did you know that you can set your Max file to open automatically in Presentation Mode?
(You can cut to the chase if you don’t want to read the full explanation.)

As you know, there are two main modes of operation in a Max patcher. When you’re building a Max program (a.k.a. a “patch”) in the Max patcher window, you’re the programmer and you’re working in Edit Mode. When you want to actually run the program as a user, you switch to Run Mode. This is also sometimes called unlocked mode (editing) and locked mode (running). You can toggle between Edit Mode and Run Mode in one of three ways: 1) by clicking on the lock icon in the bottom left corner of the patcher window, or 2) by Command-clicking (Control-clicking in Windows) on some empty space in the patcher window, or 3) by typing Command-E (Control-E in Windows).

You also know that there are two different appearances your Max patch can have: normal Patching Mode (for building the patch and for running it while you’re trying it out) and a Presentation Mode (for presenting a polished user interface to the end user of your program). Regardless of whether you’re in Presentation Mode or Patching Mode, within each of those two modes you can either be in unlocked Edit Mode (for changing things about the way the patch looks or works) or locked Run Mode (for actually using the program).

To toggle between Patching Mode and Presentation Mode, you can either 1) click on the easel icon in the bottom border of the patcher window or 2) type Command-Option-E (Control-Alt-E in Windows). Within either Patching Mode or Presentation Mode, you can toggle back and forth between locked Edit Mode or unlocked Run Mode.

Presentation Mode contains a subset of all the objects that are visible in Patching Mode. While you’re in Patching Mode, in Edit Mode, you choose which objects you want to have belong to the presentation by selecting the objects and choosing the Add to Presentation command from the Object menu. When you toggle into Presentation Mode, only those objects that have been added to the presentation will be visible. In Presentation Mode, while in Edit Mode, you can rearrange and resize those objects however you want in order to get the precise look you want, without altering the layout or functionality of your patch when it’s viewed in Patching Mode. In this way you can organize your patch in the way that most makes sense to you as a programmer, then you can create a look and an organization that you think is most desirable for the end user to encounter.

Every time you create a new patcher window with the New Patcher command from the File menu, the window opens in normal Patching Mode and it’s in Edit Mode, which makes sense because there’s not yet anything in it, and you need to do some patching to build the program. Once you have made a patch and saved it as a file, the next time you open that file it will open in Run Mode because it assumes that you want to use (run) the program you made earlier. Of course, if you need to make further changes to it, you can always toggle it into Edit Mode. In all cases, though, whether you’re opening a new patcher or a previously-saved patch, the default behavior is for the window to open in normal Patching Mode, rather than in Presentation Mode. (I personally think of Patching Mode as “Normal Mode” because Presentation Mode is something that only appeared in version 5 of Max.)

However… (finally we get to the point of this long-winded explanation!)

Here’s how:

When you have a finished product and you’d like for it to open directly into Presentation Mode so that the user is presented with a beautifully laid out interface:
1) Make sure you’re in Edit Mode with no objects selected.
2) Open the Inspector by clicking on the i icon in the right border of the patcher window or by typing Command-I (Control-I in Windows).
3) Click on the little P icon in the top border of the Inspector to shift to the Patcher Inspector (the Inspector view that lets you set options for your entire patch).
4) Among the options categorized under View in the Patcher Inspector, enable the option called Open in Presentation.
5) Save the file.
The next time you open that file, it will open automatically in Presentation Mode.

Did You Know?

Did You Know?” is a series of short instructional videos provided by Cycling ’74 containing tidbits of useful information about Max programming. The title of the series implies “You may already know this, but just in case you don’t, here goes.” It provides tips to the intermediate user, maybe just a bit advanced or esoteric for the total novice (but maybe not), and probably already known to the expert user (but maybe not), but useful to the vast majority of users.

In that spirit, I’ve created a category of post in this blogsite with the same name, “Did You Know?”, and I’ll occasionally post similar tidbits of information of that sort that begin with that phrase.

Imperative Programming

Traditionally, programming languages use an “imperative” mode, giving action commands to the computer of specific procedures it should enact.

At a low structural level, a “machine language” is used to give very specific instructions to the machine telling it what circuits to open and close. That language is very different from the so-called “natural language” that we use in everyday speech, a higher conceptual-level language with which we would describe a program’s actions verbally. In between those two extreme levels exist one or more other languages that can be typed in by a human, then compiled or interpreted into machine language giving specific instructions to the computer.

When we want to describe a program without reference to any specific programming language, we often explain it in plain natural language or in some mixture of natural language and hypothetical programming language that isn’t strictly correct in any actual programming language. This is often called “pseudo-code”.


“Pseudo-code” for the procedures that will convert Celsius to Fahrenheit

Print “Enter a number of degrees Celsius: “.
Wait until the user types the ‘Enter’ key.
Get whatever was typed up till the ‘Enter’ key, and put it in the memory location named c.
Multiply the value stored in memory location c by 9, then divide the result by 5, then add 32 to that, then store the result in the memory location named f.
Print “That’s equal to “.
Print the value stored in memory location f.
Print ” degrees Fahrenheit.”
Print the ‘Return’ character.


C code for the program ctof.c

#include <stdio.h>

int main( void ){
  float c, f;
  printf( "Enter a number of degrees Celsius: " );
  scanf( "%f", &c);
  f = c*9/5+32;
  printf( "That's equal to %.2f degrees Fahrenheit.\n", f );
  return 0;
}

Assignment for January 13, 2015

Begin to teach yourself the Max programming environment, especially the objects for audio known collectively as MSP (Max Signal Processing). The following paragraphs will give you some suggestions about how best to do that.

Then look below that for the specific project assignment.


Resources for Learning Max

There are many resources for learning Max, including (but certainly not limited to):
1) The tutorials that are provided as part of the application, each of which is accompanied by an example program. You can access those tutorials via the Help menu within the Max application, or you can read the Max Tutorials and MSP Tutorials online.
2) You can open a help file for any Max object, which itself is a working Max program demonstrating the object in action, by Alt-Clicking or Option-Clicking on the object in a Max patcher window.
3) For a super basic introduction to the rudimentary concepts and conventions of Max, you can read this excerpt from an old version of the Max documentation. The graphics are antiquated but the information is still largely correct.
4) You can find online many of the professor’s examples made for prior classes that involved Max.
5) As you work in Max, you can consult the extensive reference documentation via the Help menu or on the Web.
6) You can find many video tutorials about Max on YouTube.


The MSP Tutorials are written in a way that assumes you already know the basics of Max programming for non-audio events. But rather than you actually spending a whole lot of time on the non-MSP Max Tutorials, for the most part I think you’ll do OK by jumping right into the MSP Tutorials and then looking up aspects of Max that those tutorials don’t explain. So I suggest:
1) Read the pages of information about the Rudiments of Max excerpted from an old version of the Max documentation
2) Read the introductory chapters of the MSP Tutorials titled “Introduction” and “How MSP Works“.
3) Work through MSP Tutorials 1, 2, and 3 (plus 6 if you feel like testing what you’ve learned).
4) Study the following examples online:
– Example 1: Open a sound file and play it.
– Example 2: Preload and play sound cues.

Then you will know enough to do the following project assignment.

Project

Try out the online Drum Kit program by Ron Winter. Think about how the program works. Could you make a program in Max that works similarly? Try to build a Max patch that duplicates as much of the capability of that program as possible (although your program can be a much smaller and simpler version with fewer sounds and less stunning graphics). Here are some hints of Max objects that you might need: dac~, sfplay~, key, select, message, fpic (or the Paste Picture command in the Edit menu), ubutton, comment, loadbang. You’ll also need some sound files. Use AIFF or WAVE or MP3 files. Download them from the web (e.g. www.freesound.org) or borrow them from other programs or sources, or record them yourself. You don’t need to use the same sounds or graphics as are used in the model program; feel free to create your own library of interesting sounds for this purpose if you’d like. Note that the model program can play polyphonically (i.e., can play multiple simultaneous sounds); that’s a moderately complicated thing to program successfully in Max, so don’t feel obliged to try to implement that capability (unless, of course, you want to take on the challenge). If you think of improvements or elaborations or new ideas to change or extend the program, that’s fine, but make a basic imitation of the model program first. Be prepared to demonstrate your program in class.

Deposit your solution in the EEE DropBox called “SamplePlayer1”. Since your project probably needs to reference specific sound files, save your .maxpat Max patch(es) and your .wav or .aif sound files in the same folder, compress that folder as a .zip archive, then upload the .zip file to the DropBox.