Delay with feedback

Some interesting effects can be obtained by feeding the output of a delay line back into itself and adding that to whatever new sound is coming in. The result is delays of delays, echoes of echoes, etc. As was shown in the discussion of Comb filtering, short delays fed back at a specific rate will have a strong resonance effect on the timbre of a sound. A filter that uses feedback of short-time delayed sound is called a recursive filter. Recursion is the process of applying a procedure to the result of that same procedure. It’s sometimes useful in programming, but it’s only possible in Max if a suitable amount of time is allowed to elapse so that the program doesn’t get into an infinite, unbreakable loop.

So there’s a problem with feedback in MSP. If an MSP signal chain included the necessity to have its own output in order to calculate its own output, you can see how that would be impossible (or would require an infinite amount of time). However, MSP calculates audio in “chunks” or “vectors” composed of several samples at a time (usually some power of 2,  such as 64 for example, which would be just under 1.5 milliseconds assuming a sampling rate of 44,100 Hz). That means that if we’re willing to wait until at least one vector of samples has been calculated and sent out, we can use delay feedback. (Filter objects such as reson~ can use a shorter feedback time, because the object itself stores the fed-back information internally from one signal vector to the next.)

The tapout~ object has a minimum delay time equal to one signal vector’s worth of samples. No shorter delay is possible with tapout~, but the advantage of setting that minimum is that you can feed tapout~‘s output back into the input of its associated tapin~ object and it will have at least a one-vector delay to avoid an infinite loop of recursive calculation.

Scaled output fed back to input

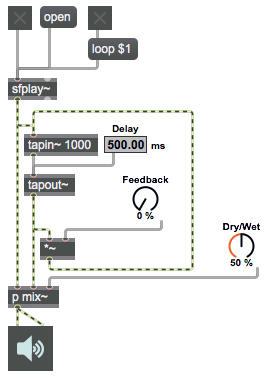
You will always want to scale the feedback signal down by some amount between 0 and 1 in order to ensure that the total amplitude (the sum of original plus feedback) doesn’t increase beyond the range of clipping. Here we use the right outlet of a live.dial object to provide an amplitude-scaling number from 0 to 1.

Delay with tapin~ and tapout~

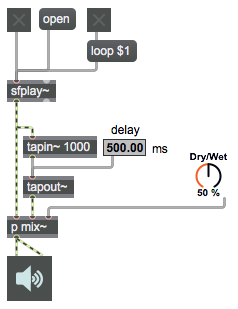
In addition to the delay~ object, another way to implement a circular buffer for audio delay is with the pair of objects called tapin~ and tapout~. Those two objects are always used as a pair; the outlet of a tapin~ object should only be connected to the left inlet of a tapout~ object. The tapin~ creates a buffer space in memory, and the tapout~ object accesses that memory some amount of time in the past; the patch cord connecting those two ensures that they refer to the same place in memory.

Unlike with delay~, for tapin~ and tapout~ you specify the buffer size and the delay time in milliseconds rather than samples.

Control delay time and wet/dry mix

Most user interfaces for delay provide the user with a control for the delay time (either specified as an absolute time or as a tempo-relative rhythmic unit) and a control for the balance between the original (“dry”) sound and the delayed (“wet”) sound. We’ve provided those two controls here, as a live.numbox and a live.dial.

Comb filtering

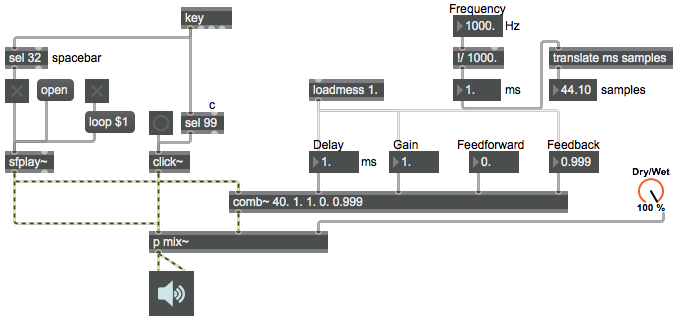
Because of the phase cancellation effect caused when a sound is mixed with a delayed copy of itself, the resonance or attenuation (strengthening or weakening) of the frequencies caused by that delay is heavily dependent on the delay time. If a sinusoidal component of a sound is delayed by exactly one cycle (i.e., one period, i.e. one over the frequency) or any whole number of cycles, and mixed with the original sound, that component will be reinforced; conversely, if a component is delayed by one-half period, it will be cancelled. So if a sound is delayed by 1 millisecond—1/1000 of a second—and mixed with the original, then all whole-number multiples of 1000 Hz will be reinforced in that sound, and all the frequencies directly between those (e.g. 1500 Hz, 2500 Hz, etc.) will be suppressed. This regular harmonic pattern of resonance and attenuation is known as comb filtering. Comb filtering is achieved with a single delay, timed to resonate a particular frequency. The resonated fundamental, and all of its harmonic multiples, will be equal to one over the delay time (i.e., the inverse of the delay period). So a delay of 1/440 of a second (2.273 milliseconds) mixed with the original will reinforce the pitch A at 440 Hz and its harmonics and will suppress the intermediate frequencies, especially those directly between harmonics such as 660 Hz, 1100 Hz, etc.

This patch allows you to experiment with comb filtering, using the comb~ object. The resonating and attenuating effect is even more pronounced when the output of the comb filter is fed back into its own input, a capability that comb~ provides internally. This patch is initialize to very heavily impose comb filtering at 1000 Hz, due to its very high initial feedback coefficient. (So beware when you turn audio on and trigger an impulse into it.)

Resonate harmonics of a chosen frequency

You can experiment with feeding an impulse or a sound file into comb~ with different delay times and with different settings for the feedforward (input delay) and feedback (output re-delay) coefficients (multipliers).

Short delay creates a timbre change

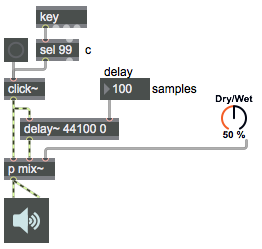
A single sample value of 1 (surrounded on either side by sample values of 0) is the shortest possible sound that can be represented in a digital audio signal. Electrical engineers call this signal an impulse. It theoretically contains every frequency up to the Nyquist frequency (one-half the sample rate), so it’s useful for testing filters and for determining the mathematical formulae to describe different sorts of filtering effects.

Short delay is heard as timbre change

In MSP, the click~ object sends out such a signal whenever it receives the message ‘bang’ in its inlet. Because it’s the shortest possible sound we can make, it’s good for experimenting to see how much two sounds may differ in their onset time before we can detect that they’re not simultaneous. The delay~ object delays the click by a certain number of samples, and the two sounds—the initial impulse and its delayed copy—are mixed together in the patcher mix~ subpatch. When the delay time is sufficiently short, the two clicks will fuse together in our perception, albeit with a slight timbre change. Only when the delay is sufficiently large (greater than our perceptual threshold of “the present”) can we discern that the sound we hear is actually two separate events. Try experimenting with different short delay times, to hear the timbre change the delay creates and to see when the two clicks become perceptible to you as non-simultaneous.

Phase cancellation due to delay

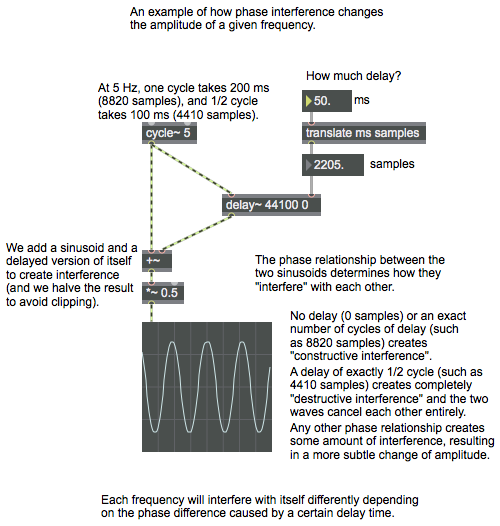
A sinusoid added to a delayed version of itself will result in a sinusoid of the same frequency but with its amplitude altered. The amount of amplitude change will depend on the phase relationship between the original sinusoid and its delayed copy. The two sinusoids will “interfere” with each other either constructively (reinforcing each other) or destructively (tending to cancel each other). For example, two sinusoids that are out of phase by exactly one-half cycle will theoretically completely cancel each other, because one is effectively a flipped version of the other around the x axis (i.e., around 0 on the y axis).

The amount of phase difference caused by delay depends on the delay time and the frequency of the sinusoid in question. Because every complex sound is composed of energy at multiple frequencies, in effect, it’s the sum of many sinusoids. Mixing any sound with a slightly delayed copy of itself will therefore alter the amplitude of each of the component frequencies of the sound, in varying amounts depending on the delay time and the frequencies involved.

This patch allows you to experiment with delay applied to a single sinusoid, to notice the interference effect. Bear in mind that this sort of effect occurs on every frequency component of any sound treated in this way.

Amplitude change due to phase difference

In the example, we view a 5 Hz sinusoid. It’s not audible, of course, but because of its low frequency it’s easy to view in a scope~ object, and it’s easy to calculate the period of one cycle. (The period is the inverse of the frequency, so the period is 1/5 second, which is to say 200 milliseconds.) And with a sample rate of 44,100 Hz, it’s pretty easy to calculate how many samples are used for one cycle of the waveform (8820 samples) and how many samples correspond to one-half cycle of the waveform (4410 samples).

Delaying sound—an overview

Many interesting audio effects are achieved by combining a sound with a delayed (and possibly altered) version of itself. To delay a sound, one needs to store it for a certain amount of time till (a delayed copy of) it is needed. That storage has to be constantly ongoing when we’re dealing with realtime audio processing, yet we usually also want to dispose of the delayed audio data once it’s no longer needed. Realtime delay of audio is therefore most often achieved by storing the sound in what’s commonly called a ring buffer or a circular buffer.

In MSP a circular buffer is implemented in the delay~ object, and also in the pair of objects called tapin~ and tapout~. Here are some examples from a previous class.
Simple delay of audio signal
Delay with tempo-relative timing
Simple flanging
Delay with feedback

There are some MSP Tutorials that deal with delayed sound. [The links below are to the web version of the documentation, but you’ll probably prefer to use the Reference documentation within Max so that you can try out the tutorial patches while you read about them.]
Delay Lines
Delay Lines with Feedback
Flanging
Chorus
Comb Filter

And here are some more examples from a past class.
Change of delay time may cause clicks
Continuous change of delay time causes a pitch shift
Ducking when changing delay time
Abstraction for crossfading between delay times
Demonstration of crossfading delay

Filtering is a special case of delay, using extremely short delay times to create interference between a sound and a slightly delayed version of itself, which causes certain frequencies in the sound to be attenuated (lessened in strength) or resonated (increased in strength), changing the sound’s timbre. [These are links to the web version of two MSP tutorials; you may prefer to read them in the Max Documentation within the Max application.]
Simple filters
Variable type filters

Here’s a very thorough tutorial on filters in MSP written by Peter Elsea.

And here are some filter examples from a past class.
Bandpass filter swept with a LFO
A variable-mode filter: biquad~
Smooth filter changes


Harmonizer written in JavaScript

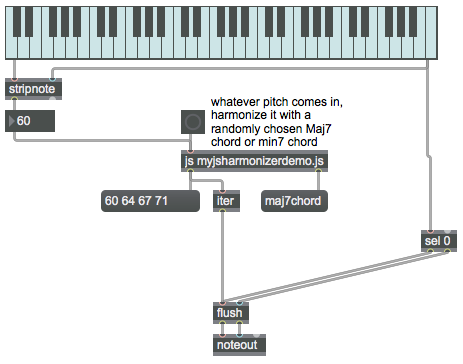
As a demo project to explore JavaScript programming in Max, this patch implements a script that harmonizes any played MIDI note with either a major seventh chord or a minor seventh chord that contains the played note. For any given pitch, there are four different major seventh chords and four different minor seventh chords that contain that pitch.

In order for this patch to work, you will first need to download the JavaScript file and store it in Max’s files search path.

Each played note triggers a 4-note chord

The script defines the two chord types as pitch class sets stored in global arrays, chooses one of the two chord types at random, randomly chooses and configures an inversion for the chord, then transposes that chord (in its chosen inversion) to include the played pitch.

Using JavaScript in Max

The js object allows you to use JavaScript in Max.

You can learn a few of the basics of implementing JavaScript programs within Max by studying this set of three small JavaScript programs. Download and save the six files found in that directory. The files are meant to be studied in progressive order: 1) bang2x.maxpat, 2) number1x.maxpat, 3) numbearray.maxpat. Within each patch, double-click on the js object to open the script it contains.

You can look up details of the core JavaScript language in the official JavaScript reference manual. You can read about Max-specific aspects of JavaScript in the JavaScript documentation found in the Max application’s Reference manual, which you can also read in the online version. In that documentation, most of the vital introductory information is contained in the chapters titled Introduction, and Basic Techniques.

Choose one of several sounds

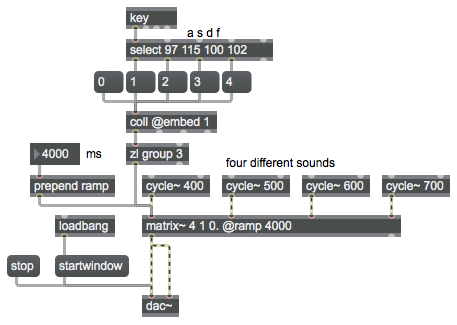
The matrix~ object is a multichannel audio mixer. It’s useful as a mixer of sounds, and also as an audio switcher/router, because you can route any input to any output, with built-in interpolation for smooth, click-free amplitude changes.

In this example, we use matrix~ as a 4-in/1-out mixer to choose one of four possible input sounds, with an adjustable crossfade time (the matrix~ object’s ‘ramp’ attribute) between the old sound and the newly chosen one.

Crossfade between old sound and new sound

The messages to change amplitudes in matrix~ might seem a little cumbersome, but the message format is necessary to allow the sort of versatility that matrix~ provides, letting you set the gain level for the connection of any input to any output. The message format is: <inlet#> <outlet#> <gain> [ramptime]. If no ramptime value is included in the message, the timing of the ‘ramp’ attribute is used (as in this example). To manage the gain-setting messages for all the possible connections, we store full lists of settings in a coll, and then break that list up into individual message with zl. In this example we use keystrokes from four keys—a, s, d, and f—to choose which input sound we want to hear by looking up the necessary settings in the coll. The settings in the coll turn on the connection we want, and turn off all the other connections.

Add text to video in GL

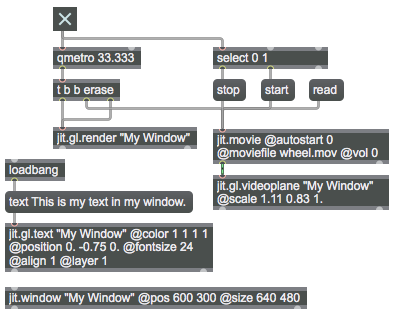
An earlier example demonstrated a method to Write subtitles onto a video in Jitter, using the jit.lcd object and adding its output to that of a jit.movie object. Another method is to render both video and text in GL using the jit.gl.videoplane and jit.gl.text objects. This latter way is more computationally efficient because the rendering takes place on the graphics card of the computer instead of within a Jitter matrix on the computer’s CPU.

Render text on top of video

In this example, notice that the jit.gl.videoplane object has been scaled in the x and y dimensions so that it will have a 4:3 (x:y) aspect ratio corresponding to the dimensions of the video and the window that’s displaying it. Note also that the jit.gl.text object has its ‘layer’ attribute set to 1, which causes it to be drawn after (i.e., in front of) the jit.gl.videoplane, which is in layer 0 by default. (Lower layer numbers are drawn first.)