Jitter object overview

Did you know that there’s a patch that comes with Max that provides a helpful listing of just about every Jitter object categorized by the type of thing the object can do, a terse description of what each does, and a way to click to see the help file or reference page for each object?

/Users/Shared/Max 7/Examples/jitter-examples/overview/jitter.overview.maxpat

Detect when a movie has been read successfully

Did you know that the jit.movie (or jit.qt.movie) object will report when it has completed a ‘read’ operation? You can show that report to the user as visual feedback, and/or you can use that report to trigger other events in your program, such as querying for information about the movie that is being read.

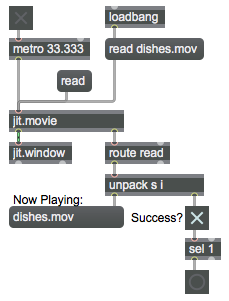
When jit.movie receives a ‘read’ message it opens the specified movie file and reads in the first frame of video (followed by successive frames if the ‘autostart’ attribute is on). It also sends out a ‘read’ message of its own out its right outlet, reporting the name of the file and a “flag” (a 1 or a 0) telling whether the read operation was successful. A typical output message might look like ‘read dishes.mov 1’. By looking for that success flag in the outgoing ‘read’ message (using a select 1 object), you can confirm that the operation was successful, and can trigger other things to happen.

report when movie is read

The route object in this patch looks for the selector ‘read’ and sends the rest of the message (the filename and the success flag) out its left outlet, the unpack object separates the symbol (the filename) from the integer (the flag), and the sel 1 object sends a ‘bang’ if the file opened successfully.

The example patches “Movie attributes” and “Attributes of jit.qt.movie” show how to use that ‘bang’ to query the jit.movie object for other useful information contained in the movie’s attributes, such as its duration, its frame rate, etc.

There are several ways to turn MSP on and off

Did you know that there are several different ways to turn MSP audio on and off in Max?

In order for Max to compute audio, it’s necessary to explicitly turn MSP on. You can read about the reasoning behind turning MSP on and off if you want; this post will show you the various ways to do it.

1. The easiest way to turn MSP on and off is with the ezadc~ object or the ezdac~ object. Just put one in your patch and, voilà, you’ve got an on/off switch for MSP computation. Once the patch is locked, you can turn audio on/off by clicking on one of those objects.

2. You can also turn audio on with a ‘start‘ message to one of those objects and turn it off with a ‘stop‘ message.

3. You can also turn audio on and off with an integer (‘int‘) message to one of those objects. Any nonzero integer will turn MSP on, and 0 will turn it off. N.B. Interestingly, unlike most Max objects, these objects will not convert ‘float‘ to ‘int‘. If these objects receive a message of type float such as 3.14, rather than truncate the number and convert it to an int, they’ll simply report “doesn’t understand ‘float'” in the Max Console window.

4. Normally when MSP is on, it’s on in all loaded patches. The message ‘startwindow’ to either of these two objects, however, will turn on audio only in the patch where the message was received (and in subpatches of that patch), and will stop audio in all other patches.

N.B. In Max 7, the ezadc~ and ezdac~ objects each have a ‘local’ attribute. When that attribute is enabled, the mouse-click behaves like ‘startwindow’ and ‘stop’ instead of ‘start’ and ‘stop’.

5. The above methods 2, 3, and 4 apply equally well using the plain ol’ adc~ and dac~ objects. Those objects don’t provide the user-interface characteristics of their ezadc~ and ezdac~ counterparts, but in terms of the messages described above they behave identically.

N.B. Another important distinction is that the user-interface objects ezadc~ and ezdac~ are fixed at 2 channels of signal input/output communicating with channels 1 and 2 of the audio interface; adc~ and dac~ are also stereo by default, but they can be set to communicate with any number of specific channels of the audio interface depending on the typed-in channel arguments. That capability is essential for addressing specific channels of a multi-channel audio interface.

6. The adstatus object reports and/or sets different aspects of MSP. What it reports or sets depends on the argument that you type in after the object name. The argument switch refers to MSP’s on/off status, so an object adstatus switch allows you to report or set the on/off status of MSP. In either of its inlets, a nonzero integer turns MSP on, and 0 turns MSP off.

7. It’s a relatively unknown or at least underappreciated fact that a message object can send a message to any receive object by starting its message with a semicolon and the name of the receive object. This is a “Did You Know?” bit of knowledge, of the sort that’s well known to some people and completely unknown to others. Well, did you know that you can send a message to MSP itself using a message box, by starting its message with a semicolon and the word ‘dsp’? Thus, triggering a message box that contains the message ‘; dsp start’ starts MSP, and triggering a message box that contains the message ‘; dsp stop’ stops MSP.

8. In the Audio Status window, there’s a button to turn MSP on/off. You get to the Audio Status window by choosing Audio Status… from the Options menu, or by sending an ‘open’ message to any adc~, dac~, ezadc~, or ezdac~ object.

9. In Max 7 each patcher window has an Audio On/Off button in the bottom right corner. (The button is disabled until the patch contains at least one MSP object.)

In addition to all of those methods of turning MSP on and off, there are a few ways you can turn off MSP selectively in certain subpatches (patcher objects) or abstractions (other patches loaded in as objects in a main patch). The next three items address some of those methods.

10. You can disable/enable the audio and MIDI capabilities of a subpatch or an abstraction by attaching a pcontrol object to the subpatch’s left inlet and sending a message ‘enable 0’ or ‘enable 1’ (or any nonzero number) to the pcontrol object.

11. You can disable/enable the audio capabilities of a subpatch or an abstraction by attaching a mute~ object to the subpatch’s left inlet and sending an int to mute~: any nonzero int will mute the attached subpatch, and 0 will unmute it.

Note that “muting” is conceptually the opposite of “enabling”, so methods 10 and 11 above work in opposite ways. Think of the 0 and the nonzero numbers as meaning “no” and “yes” respectively. So the message ‘enable 0’ to pcontrol means, “no, don’t enable the subpatch”, whereas the message “1” to mute~ means, “yes, do mute the subpatch”.

N.B. The use of mute~ and pcontrol to turn MSP computation on/off in a subpatch or abstraction is officially “deprecated” by Cycling ’74. That means that the company doesn’t guarantee that those methods will work in future versions of Max, so your patch may no longer work properly if Cycling ’74 stops supporting that feature. So far, as of Max 7, these methods continue to work fine. But you’ve been warned. For the Cycling ’74 approved way of muting subsidiary parts of a patch selectively, see method 12 below.

12. The poly~ object is a container for multiple instances of a subpatch. It’s intended to facilitate polyphonic use of multiple instances of the same subpatch, and it allows each instance of the subpatch to be muted independently with a ‘mute 1’ message and unmuted with ‘mute 0’. So when you need to stop and start computation within a subpatch, even for muting and unmuting a single instance of a subpatch, encapsulating it inside a poly~ is the preferred method.

(13.) This last method isn’t really about turning MSP on and off, but it’s useful knowledge for listening to different parts of a multi-patch signal network. In Max 7, you can create a Solo button and/or a Mute button for any patcher window. In the bottom right corner of a patcher window, you can right-click (or Control-Click in Mac OS) on the Audio On/Off button, which will present you with a popup menu that allows you to create a Solo button and/or a Mute button. Those buttons work as you might expect, just like comparable buttons on an audio mixer. The Mute button will silence (but not actually stop the computation of) all audio being sent to any dac~ or ezadc~ object in that particular patch. The Solo button will silence (but not actually stop the computation of) all audio being sent to any dac~ or ezadc~ objects in all other patches.

Conclusion

If your Max program does anything with audio, it should simply (automatically) turn audio on immediately and leave it on.

Somewhere in your patch you should automate one of the above methods of turning MSP on. The method that involves the fewest objects is to use a loadbang object to trigger a message box containing the message ‘; dsp start’. Place that in your main patch, and (provided you have at least one MSP object in the patch) audio processing will always be underway.

You can see an example patch showing many of the ways to turn MSP on and off.

Int and Float

Did you know that some Max objects make a distinction between integer numbers and numbers that have a fractional part? It’s often important to remember this, and to specify the kind of number you’re using, so that calculations in your program will be made correctly. (You can cut to the chase if you don’t want to read the full explanation.)

An integer is a number that has no decimal point or fractional part, such as …-3, -2, -1, 0, 1, 2, 3… etc. These numbers are most commonly stored in the computer’s memory with a particular data type called “long integer”, which sometimes shortened to “long” or just “int“.

Numbers that have a fractional part, or even that just have a decimal point—such as 3.1416 or 0.999999 or -7.—are usually stored differently in the computer’s memory, with a method called “floating point”, which is usually shortened to “float“.

The important thing to know for the purpose of programming in Max is that these two types of numbers exist as two separate types of message in Max. You can read about the main types of different messages in Max in the article excerpted from the original Max manual, called Rudiments of Max.

Objects that expect to get a message of type ‘float’ in their inlets can usually handle ‘int’ messages just as well; the object will simply convert an ‘int’ (such as -7) into a ‘float’ (such as -7.000000). However, some objects expect to get a message of type ‘int’ in a particular inlet, and if they get a ‘float’ number instead, they simply “truncate” (i.e. chop off) the fractional part. For example, the number 3.1416 would get converted to 3 by such an inlet. If you don’t know about that fact, you might be sometimes mystified by what seem to be miscalculations by the computer.

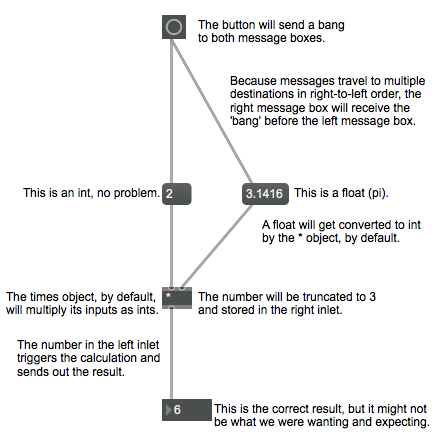
The most common way you might encounter this is when you use the math operator objects such as +, , * (times), and /. By default, those objects expect to use ‘int’ messages. For example, notice what happens in this program.

Multiplication of integers; floats are truncated (by default)

Fortunately…

Here’s how to multiply floats instead of ints:

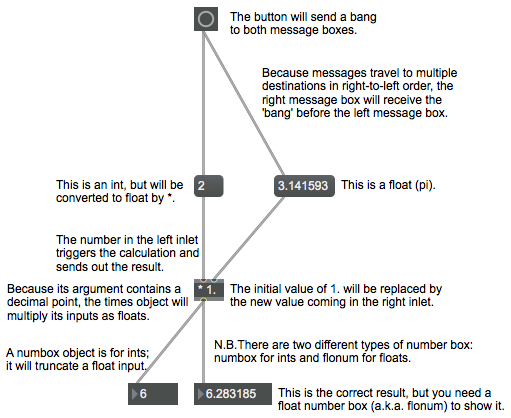
If we want to ensure multiplication using floats instead of ints, all we need to do is include an argument in the * object that contains a decimal point. The typed-in argument sets the initial value for the right inlet of math objects such as *, and if the argument contains a decimal point, the object will use floats for its calculations instead of ints, and will send out a float result.

N.B. All MSP objects (objects that handle audio data and end with a ~) use only floats for all their calculations.

Multiplication of floats, caused by float argument


How to Send a Max Patch by Email

You can send a Max patch (or any selected objects from it) to someone else as plain text in an email (or a post like this) by following these steps.

1. In Max, while in Edit mode, select the objects you want to include (or type Command-A to Select All).

2. Choose ‘Copy Compressed’ from the Edit menu.

3. Go to the program where you want to include your patch and choose ‘Paste’ from the Edit menu.

The text that you paste in will look something like the text shown at the bottom of this post. When you receive such text from someone else, to turn it back into a Max patch, follow these steps.

1. Copy the weird-looking text, including the lines that say

———-begin_max5_patcher———
and
———–end_max5_patcher———–

but not the lines that contain the HTML tags ‘<pre><code>’ and ‘</pre></code>’.

2. Go to Max and choose ‘New From Clipboard’ from the File menu.

Try it yourself. This will be a common way for you to send and receive Max patches.

<pre><code>


----------begin_max5_patcher----------
736.3ocuV00biBBE8Y8WAiOmMUIpIous+N5zICQIV5hfKfoIsS6u8kuzjtIs
Shwo9fHW.u2y4d3BuEFDsluCKi.2Cd.DD7VXPf0jwPfuePTMZWAEIsSKpfWW
iYpnItwT3cJqcFeJfuAfZKIbPwSHFCSkcyZCmoXnZrcl+VPPztQZPphmHrpU
BbgxEGv33owS.I4KrMvLSCTaC7neQr1ZBihU1HJ4fQdqpyZr2Joz5S95m+EL
83vQRd0FNIvowFquGFZdM4FoAdClAP.IukUB1Pn3AQAyRltz7jsr6QSDwoV9
HFNV7A7GfOb5AN6N9lMChJRRsvFBsMymMVfOdDAO90RTwGeGHxcR5EVPjl08
97f.dofHIOZ.QaMVJQU3yJcGTJJ2ILgVLNatKcccfK4Lf6KyPdytkq12fcgQ
TD3wQT4JUHg5Noh2bK5V+tVW9eDzsK+wpgoqe0PQ60e3KpO3pYKyMfegaKPV
5HwDyGQlPwqpN.tuYCLrOOd8X3LZ77CtTnYSEVrByPqo3iw7I5bhNmMHoNC+
h1qmpz2XRze.fCSn6olL64Ry0mbMeNLKu6fqzquXvrSIprqsVfjTwLg8wesF
wph5CDIZKtbk9mqQxJjRIHqaUt6BEzyeZFEIIEpVFwr16AoodWZBEJk+REku
FQU35F9QIMynhZDSUvEFphvYeZzZdoics+9nNybAohniVJlUodxAEK6FoHE+
Q1G7GlYuicRS+nMDcZ5Kb8eaQThZ+Y7thnOZPIv505csSk4jYchMaLDQIr++
diVsgw9mUf5qBIJ5RKdQO3fdnT6RMP5ByG5y2cd+DM9k5GyAHWpi7yolT1v0
au7HSeairI1J4ll7k88twHK6BBrj7QfBLNJ4RbTxmbjKEiZZ1hER+rs9PWN4
YtvzcwDaWBy00VaKRf2R5lep0BRnKWnzpvVgSuuK2cKb6N.AqkXWcnAcZWZK
UYp7HaPE9MH5JZguG9O.Cr79vC
-----------end_max5_patcher-----------

</code></pre>

Opening in Presentation Mode

Did you know that you can set your Max file to open automatically in Presentation Mode?
(You can cut to the chase if you don’t want to read the full explanation.)

As you know, there are two main modes of operation in a Max patcher. When you’re building a Max program (a.k.a. a “patch”) in the Max patcher window, you’re the programmer and you’re working in Edit Mode. When you want to actually run the program as a user, you switch to Run Mode. This is also sometimes called unlocked mode (editing) and locked mode (running). You can toggle between Edit Mode and Run Mode in one of three ways: 1) by clicking on the lock icon in the bottom left corner of the patcher window, or 2) by Command-clicking (Control-clicking in Windows) on some empty space in the patcher window, or 3) by typing Command-E (Control-E in Windows).

You also know that there are two different appearances your Max patch can have: normal Patching Mode (for building the patch and for running it while you’re trying it out) and a Presentation Mode (for presenting a polished user interface to the end user of your program). Regardless of whether you’re in Presentation Mode or Patching Mode, within each of those two modes you can either be in unlocked Edit Mode (for changing things about the way the patch looks or works) or locked Run Mode (for actually using the program).

To toggle between Patching Mode and Presentation Mode, you can either 1) click on the easel icon in the bottom border of the patcher window or 2) type Command-Option-E (Control-Alt-E in Windows). Within either Patching Mode or Presentation Mode, you can toggle back and forth between locked Edit Mode or unlocked Run Mode.

Presentation Mode contains a subset of all the objects that are visible in Patching Mode. While you’re in Patching Mode, in Edit Mode, you choose which objects you want to have belong to the presentation by selecting the objects and choosing the Add to Presentation command from the Object menu. When you toggle into Presentation Mode, only those objects that have been added to the presentation will be visible. In Presentation Mode, while in Edit Mode, you can rearrange and resize those objects however you want in order to get the precise look you want, without altering the layout or functionality of your patch when it’s viewed in Patching Mode. In this way you can organize your patch in the way that most makes sense to you as a programmer, then you can create a look and an organization that you think is most desirable for the end user to encounter.

Every time you create a new patcher window with the New Patcher command from the File menu, the window opens in normal Patching Mode and it’s in Edit Mode, which makes sense because there’s not yet anything in it, and you need to do some patching to build the program. Once you have made a patch and saved it as a file, the next time you open that file it will open in Run Mode because it assumes that you want to use (run) the program you made earlier. Of course, if you need to make further changes to it, you can always toggle it into Edit Mode. In all cases, though, whether you’re opening a new patcher or a previously-saved patch, the default behavior is for the window to open in normal Patching Mode, rather than in Presentation Mode. (I personally think of Patching Mode as “Normal Mode” because Presentation Mode is something that only appeared in version 5 of Max.)

However… (finally we get to the point of this long-winded explanation!)

Here’s how:

When you have a finished product and you’d like for it to open directly into Presentation Mode so that the user is presented with a beautifully laid out interface:
1) Make sure you’re in Edit Mode with no objects selected.
2) Open the Inspector by clicking on the i icon in the right border of the patcher window or by typing Command-I (Control-I in Windows).
3) Click on the little P icon in the top border of the Inspector to shift to the Patcher Inspector (the Inspector view that lets you set options for your entire patch).
4) Among the options categorized under View in the Patcher Inspector, enable the option called Open in Presentation.
5) Save the file.
The next time you open that file, it will open automatically in Presentation Mode.

Did You Know?

Did You Know?” is a series of short instructional videos provided by Cycling ’74 containing tidbits of useful information about Max programming. The title of the series implies “You may already know this, but just in case you don’t, here goes.” It provides tips to the intermediate user, maybe just a bit advanced or esoteric for the total novice (but maybe not), and probably already known to the expert user (but maybe not), but useful to the vast majority of users.

In that spirit, I’ve created a category of post in this blogsite with the same name, “Did You Know?”, and I’ll occasionally post similar tidbits of information of that sort that begin with that phrase.