Basics of 3D animation in Jitter

OpenGL is a highly developed set of programming functions for 3D graphics and animation. It’s what’s called a cross-platform cross-language application programming interface (API), which means it can be implemented as part of a comprehensive programming environment. The developers of Jitter have included a significant number of OpenGL Jitter objects, all of which start with the name jit.gl., that allow you to render 3D drawings in Jitter.

To begin familiarizing yourself with the way that Jitter objects use Open GL for 3D animation, you can consult the Jitter Tutorials numbered 30-43.

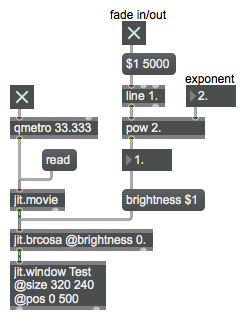
Here are some examples from past classes showing Jitter objects that enable 3D animation with Open GL.

Create a sphere in Open GL
Display a video on a shape in OpenGL
Apply a texture to a shape in OpenGL
Display a video on a plane in OpenGL
Alphablend a videoplane in OpenGL

In Jitter there are certain messages and attributes that are common to all the OpenGL objects, so they’re listed in a reference page of their own rather than in the reference page of each individual object. You can find those in the Max Documentation reference manual listing of the attributes and messages that are common to all the Open GL objects in Jitter.

sigmund~ for pitch tracking

The sigmund~ object is not a standard Max object; it’s a “third-party” object for Macintosh by Miller Puckette that you you can download and install on your computer so that it behaves just like any standard MSP object.

This patch shows sigmund~ in its most basic usage: to detect the pitch and amplitude of specific notes of an input sound.

Pitch and amplitude detection

Note that it reports the pitch as a quasi-MIDI key number value, but it includes a fractional part (which does not exist in true MIDI) for greater specificity of pitch evaluation. It’s wise, therefore, to round that value to the nearest integer if you want to detect a particular played pitch and/or you want to use that pitch as a MIDI key number. The amplitude is reported in (positive) decibels above a minimum threshold. Here we use scale to recast that amplitude as a MIDI velocity.

Easing function for animation

Simple linear motion in 2D animation is achieved by interpolating between two points and successively drawing an object at each intermediate point, as demonstrated in the example on Animating 2D graphics. However, in the real world objects move with different sorts of curved trajectories, and they also accelerate and decelerate, which you can think of as a curved trajectory of velocity in time.

The art of making animated objects seem to move naturally—called easing—is a topic that has been studied in depth. It requires using mathematics that are more complicated than simple linear interpolation. You can find many examples of different easing functions, for simulating various sorts of smooth movement.

This example uses a curved transfer function, stored in a function object, to give the impression of acceleration and deceleration to a 2D animated object. In this function there are two curved segments: one for the first half of the trajectory to simulate acceleration, and a complementary curve in the second half of the trajectory to simulate deceleration.

Simulate acceleration/deceleration

You can compare linear motion to (one particular type of) eased motion, and you can try different easing curves in the transfer function. A ggate object routes the output of the line object, either directly to the math objects for no acceleration/deceleration, or to the transfer function to simulate acceleration/deceleration.

Curve in a transfer function

You can obtain values that change exponentially or logarithmically by using the pow object or by using the pow($f1,$f2) function in the expr object. Numbers in the left inlet that stay between 0 and 1 will stay between 0 and 1 at the output. An exponent of 1 (in the right inlet) will make a linear function (output will equal input); exponents greater than 1 will create the effect of an exponential curve as the base numbers in the left inlet go from 0 to 1; exponents between 0 and 1 will create the effect of a logarithmic curve as the base numbers go from 0 to 1.

You can use the function object to make a transfer function—a table in which input numbers are used to look up corresponding numbers on the stored function. The stored function can be made up of line segments or curves (if you put the function object in Curve mode in its Inspector).

This patch shows how a single curve in a function object can be used as a lookup function that emulates an exponential curve.

Curved segment in a lookup function

In function, a curvature value of 0 makes a straight line, a positive curve value gives a quasi-exponential curve, and a negative curve value gives a quasi-logarithmic curve. When the function is in Curve mode, you can cause the segment leading to a given point to be curved with the ‘setcurve’ message. The settings in the message box show the different messages that can be used to change the appearance and behavior of function, as they were used to set up the initialization of this patch.

Half speed and double speed

For specifying the rate of an audio file or the rate of a video file, the number 1 is used for normal rate, and we may want to be able to increase or decrease the rate by a certain ratio. For example we may want to double or halve the rate, setting it to either 2 times normal or 1/2 of normal. Note that that’s a ratio of 2:1 or 1:2, but it’s not the same difference up as it is down. (It’s a difference of 1 upward, but a difference of 0.5 downward.) Therefore, to make a controller that has the “normal” rate 1 in the middle, 0.5 on one extreme and 2 on the other extreme, it may be best to use the controller to supply an exponent to the base 2. That way, we can use a controller that goes from -1 to 1, because 2-1 will equal 0.5, 21 will equal 2, and 20 (right in between -1 and 1) will equal the normal value 1.

Exponent -1 to 1

This type of dial would be good for setting audio or video rate.

Exponential video fade

This patch allows you to try different exponentialities of fade-in/fade-out of a video.

Try exponential fades

You can change the exponent of the pow object to try different exponential curves for the fade. An exponent of 1 is a linear fade.

Linear vs. exponential audio fade

An exponential amplitude fade is usually more subjectively natural-sounding than a linear amplitude fade. This patch allows you to compare the two.

Compare linear and exponential fading

Clicking on the toggle at the top of the patch will fade the test tone in and out.Clicking on the matrixctrl buttons for “Linear” and “Decibel” lets you choose between a linear fade and an exponential fade, to see which you think sounds more intuitive and natural. You can also move the sliders manually to see which you think feels more intuitive and natural.

The gain~ and live.gain~ objects (not shown here) both use exponential fading, and they internally implement interpolation between amplitude values, as demonstrated with the line~ objects in this patch.

Assignment for March 12, 2015

Prepare to make either a final presentation or a work-in-progress presentation of your final programming project.

Your presentation should be a combination of “product demo” and technical explanation. Describe what your program is, what it’s intended to do, and how it does it. Do a demonstration of the program in action (and/or allow others to try it). Describe the design process, the challenges you encountered, and how you solved (or didn’t solve) them. Walk through a technical explanation of the most important aspect(s) of your program, explaining how it works, and describing any techniques you discovered or invented along the way to accomplish it.

Class will meet in the Realtime Experimental Audio Laboratory (REALab), Room 216 of the Music and Media Building. Bring all the necessary software to run your program, including any associated media files or devices. You may come early (as much as 20 minutes in advance of the class session) to pre-install your software on the lab computer if you’d like.

Assignment for March 10, 2015

Many interesting audio effects are achieved by combining a sound with a delayed (and possibly altered) version of itself. To delay a sound, one needs to store it for a certain amount of time till (a delayed copy of) it is needed. That storage has to be constantly ongoing when we’re dealing with realtime audio processing, yet we usually also want to dispose of the delayed audio data once it’s no longer needed. Realtime delay of audio is therefore most often achieved by storing the sound in what’s commonly called a ring buffer or a circular buffer.

In preparation for the upcoming discussion of delay-based effects, study these examples from a previous class.
Simple delay of audio signal
Delay with tempo-relative timing
Simple flanging
Delay with feedback

Study the MSP Tutorials that deal with delayed sound. [These links are to the web version of the documentation, but you’ll probably prefer to use the Max Documentation within Max so that you can try out the tutorial patches while you read about them.]
Delay Lines
Delay Lines with Feedback
Flanging
Chorus
Comb Filter

If you just can’t get enough of examples of delay, check out these other examples from a past class.
Change of delay time may cause clicks
Continuous change of delay time causes a pitch shift
Ducking when changing delay time
Abstraction for crossfading between delay times
Demonstration of crossfading delay

You can also read about digital filtering. Filtering is a special case of delay, using extremely short delay times to create interference between a sound and a slightly delayed version of itself, which causes certain frequencies in the sound to be attenuated (lessened in strength) or resonated (increased in strength), changing the sound’s timbre. [These are links to the web version of two MSP tutorials; you may prefer to read them in the Max Documentation within the Max application.]
Simple filters
Variable type filters

Here’s a very thorough tutorial on filters in MSP written by Peter Elsea.

Here are some filter examples from a past class.
Bandpass filter swept with a LFO
A variable-mode filter: biquad~
Smooth filter changes