
UCI Sites has a theme created by Strategic Communications. This theme is based on the current UCI branding and emulates the UCI website. The theme has many built in options including layout options, custom header, custom menus, custom widgets and breadcrumbs. It is a responsive theme that will resize to look good on many devices including mobile phones.
Here are some tips to get the most out of this new theme.
Activating the Genesis UCI Theme
The Genesis UCI Theme is the new default theme for new blogs and websites hosted on UCI Sites. If you have an existing website, it is also available from the available themes.
- Login to your site as an administrator.
- Go to Appearance > Themes
- Look for Genesis UCI Theme and hover over the preview image.
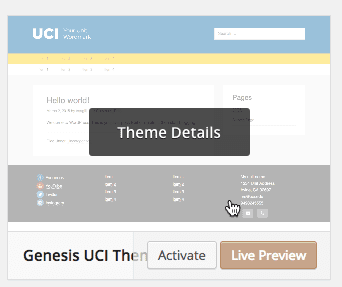
- You can either Activate it to select it or choose Live Preview. Live Preview will show you what your site will look like with the new theme and allow you to try out some customizations before committing. (Your widgets may appear in the header. These can be easily moved to a sidebar.)
- If you want to use this theme, choose Activate or Save & Activate if you are using Live Preview.

Header
By default, the header will show your Site Title and Tagline (if using). You may also opt to use a wordmark provided by University Communications.
Using Site Title
The Site Title for your site will be displayed along with the tagline if you are using one.
Changing Your Site Title
- Go to Appearance > Customize
- Expand the Site Title & Tagline settings by clicking on the triangle.
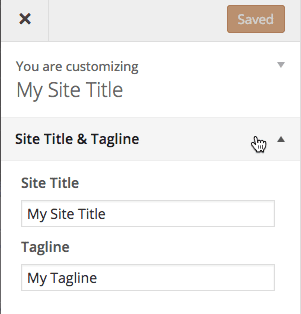
- Change the Site Title and/or Tagline
- You should see the change in the preview to the right.
- Click Save & Publish

Using a Logo in the Header
You can also upload an image to be used in the header. Strategic Communications can create the wordmark/logo for you.
Changing the Theme to Allow Logo Uploads
- Go to Genesis > Theme Settings
- In the Header panel, select Image Logo
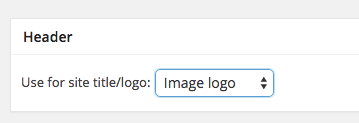
- Click Save Settings
Uploading Your Logo
- Go to Appearance > Customize
- Expand the Upload Logo settings.
- Click Select Image
- Choose the image from your Image Library or upload a new one. The recommended height for logos is 75 pixels.
- Click Save & Publish
Widgets
The theme comes with two custom widgets that can be used in the Footer to display social media icons and contact information. The standard widgets can be used in any of the widget areas including sidebars, header and 4 footer areas.
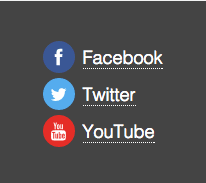
UCI Social Media List Widget
This custom widget makes it easy to put in links to your Social Media feeds. You can use icons alone or icons with text in either a vertical or horizontal display.
- Go to Appearance > Customize
- Select Widgets
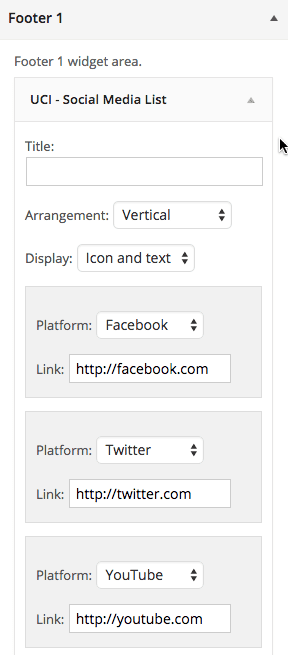
- In the Footer 1 widget area, select the UCI – Social Media List widget.
- Select the Social Media Platform (Facebook, Twitter, etc.) and add the full link or URL. (Include the http)
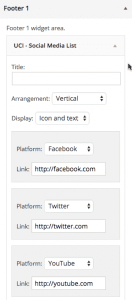
- Continue adding additional platforms and links as needed.
- You should see a preview to the left.
- Click Save & Publish

UCI Contact Info Widget
- Go to Appearance > Customize
- Select Widgets
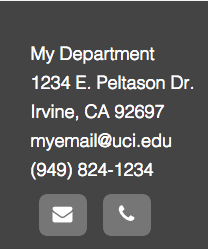
- In the Footer 4 widget area, select the UCI – Contact Info widget.
- Fill in the fields including your Unit name, address, email and phone.
- Click the Show Action box to display icons for email and phone.
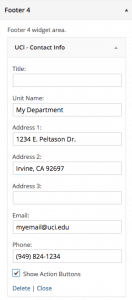
- Click Save & Publish


Front Page – Blog List or Static Page
By default, a new site will be set up so that the front page lists your most recent Posts in a blog like format. You may also opt to create a page and make that your front page. We have detailed instructions to change the front page.
Site Layout
This theme includes several layout options. You can choose a default layout and still change individual pages or posts to use a different layout.
Choosing a Default Layout
- Go to Appearance > Customize
- Expand the Site Layout settings.
- Select a default layout.
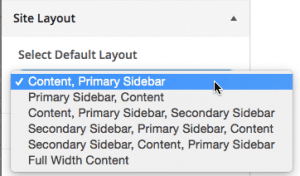
- Click Save & Publish

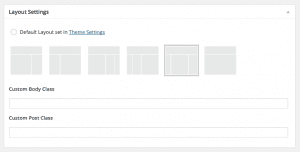
Changing the Layout on an Individual Page or Post
- Edit a page or post.
- In the Layout Settings panel, select a different layout.
- Publish or Update the page or post.

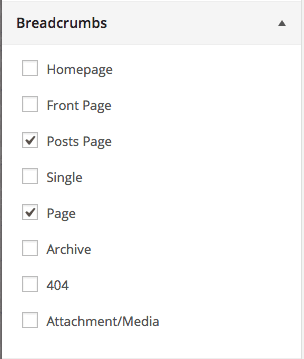
Breadcrumbs
This theme also includes Breadcrumbs. Breadcrumbs are a navigation feature that allow your readers to go up levels to other content. By default, the breadcrumbs are turned off.
Enabling the Breadcrumbs
- Go to Appearance > Customize
- Expand the Breadcrumbs settings.
- Check the types of content to display the breadcrumbs.

- Click Save & Publish


Menus (Navigation)
This theme includes two navigation areas for your custom menus. One has a yellow background (Primary) and the other white (Secondary). Both appear below the header. You can use them individually or together.
- Create one or two custom menus.
- Go to Appearance > Customize
- Expand the Navigation settings.
- Select your custom menu from Primary (yellow background) or Secondary (white background)
- Click Save & Publish


Widget Menus
You also have the option of placing one of your custom menus in any widgetized area including the Header Right area. This may be a good place for an audience menu.
- Create your custom menu. (See above)
- Go to Appearance > Customize
- Select the Widgets option.

- Select the widget area where you want to add the custom menu, for example Header Right.
- Click Add a Widget and choose Custom Menu
- In the Select Menu drop-down option, select the menu you want to use.
- The menu should be shown as a preview to the right.
- Click Save & Publish


More Questions?
Contact us. We’re here to help.